
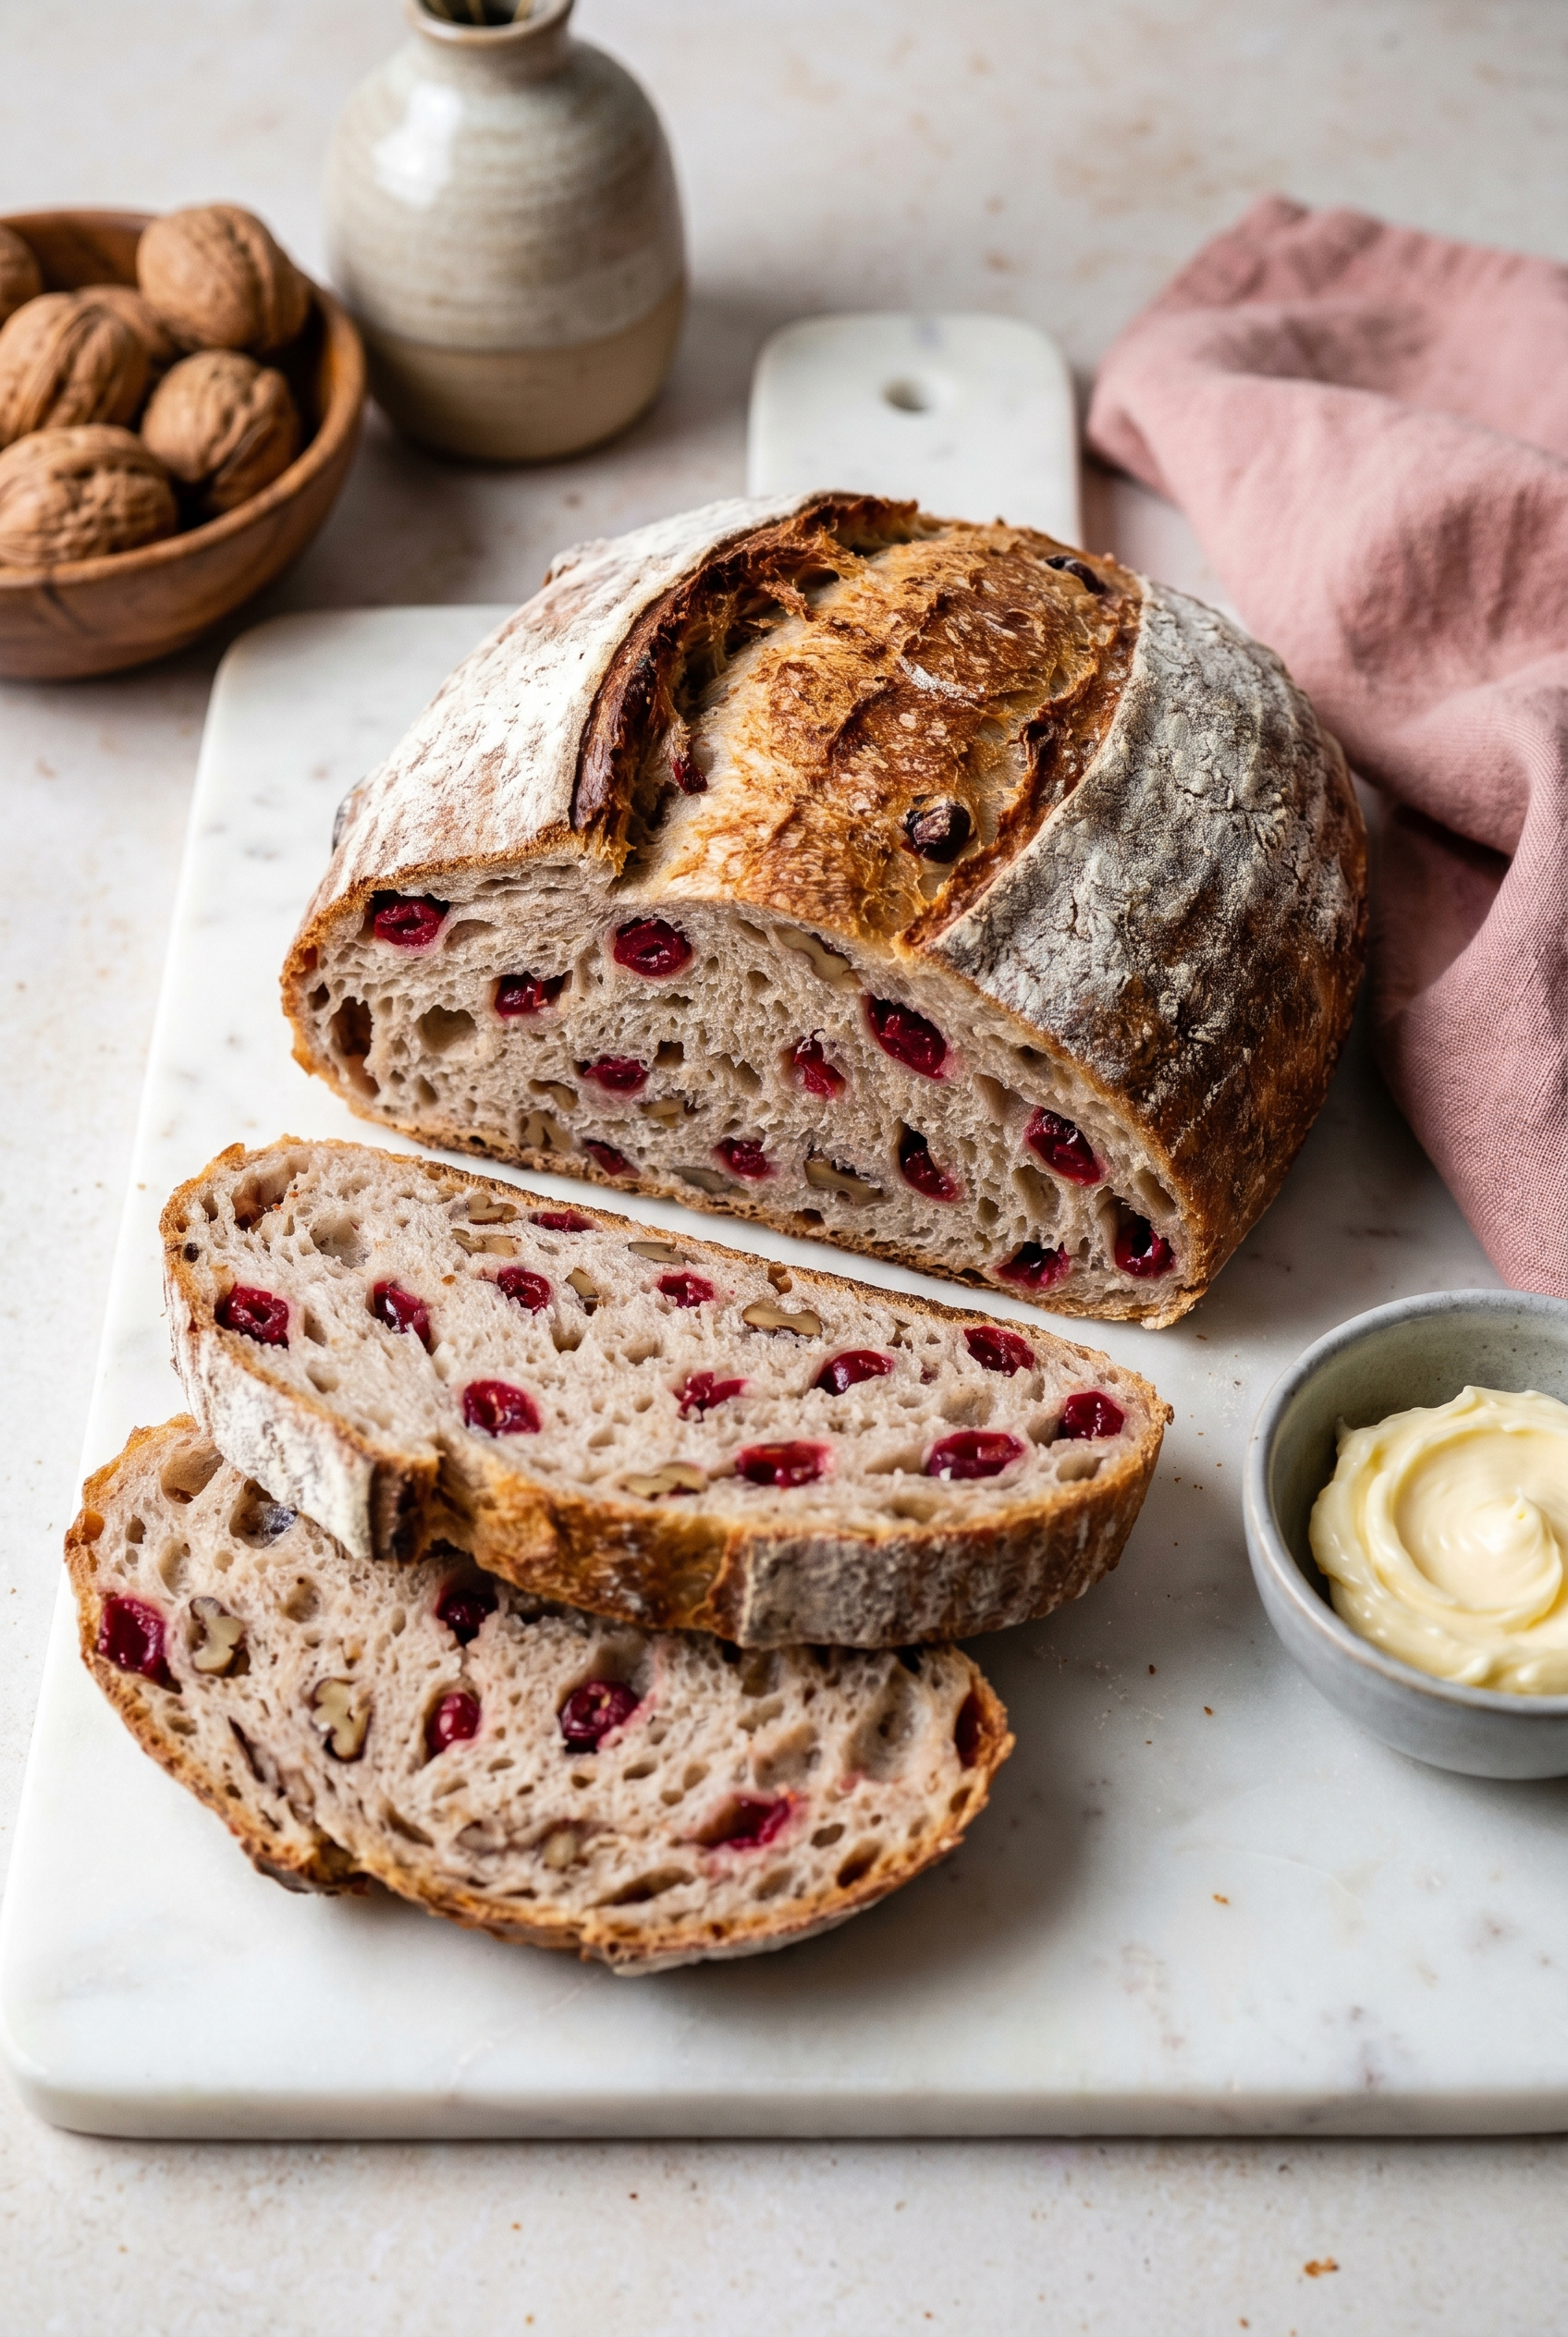
Pulling a loaf of no knead cranberry walnut bread out of your own oven, with a shatteringly crisp crust and a glossy golden dome, requires nothing more than a spatula stir and an overnight rest on the counter.
This no knead cranberry walnut bread recipe uses seven ingredients, zero kneading, and a screaming hot Dutch oven to produce the kind of homemade cranberry bread you’d pay twelve dollars for at a farmers’ market bakery.
Dried cranberries and toasted walnuts stud every slice with sweetness and crunch. The dough mixes in five minutes and bakes itself while you sleep. Here is exactly how I do it.
reader review
“I cannot believe I made bakery bread with ZERO kneading. Stirred it, left it overnight, and woke up to bake the most gorgeous crusty loaf. The crunch on that crust!! The cranberries and walnuts in every bite!! My whole house smelled amazing. Never paying $12 at the farmers market again!!!!” – Donna H.
Loved this too? Add your reviewWhy You’ll Love This Recipe
- Zero elbow grease Stir everything with a spatula and walk away for up to 18 hours. That’s genuinely it.
- Bakery-level crust Baking inside a hot Dutch oven traps steam and creates that signature artisan crunch you’d pay $12 for without the artisan price tag. This Dutch oven bread no knead method replicates professional steam-injection ovens using a pot and a lid.
- Forgiving by design. This uses a high hydration dough that corrects minor measuring imperfections on its own during the long fermentation. Slightly too much water, slightly too little, it still produces a good loaf.
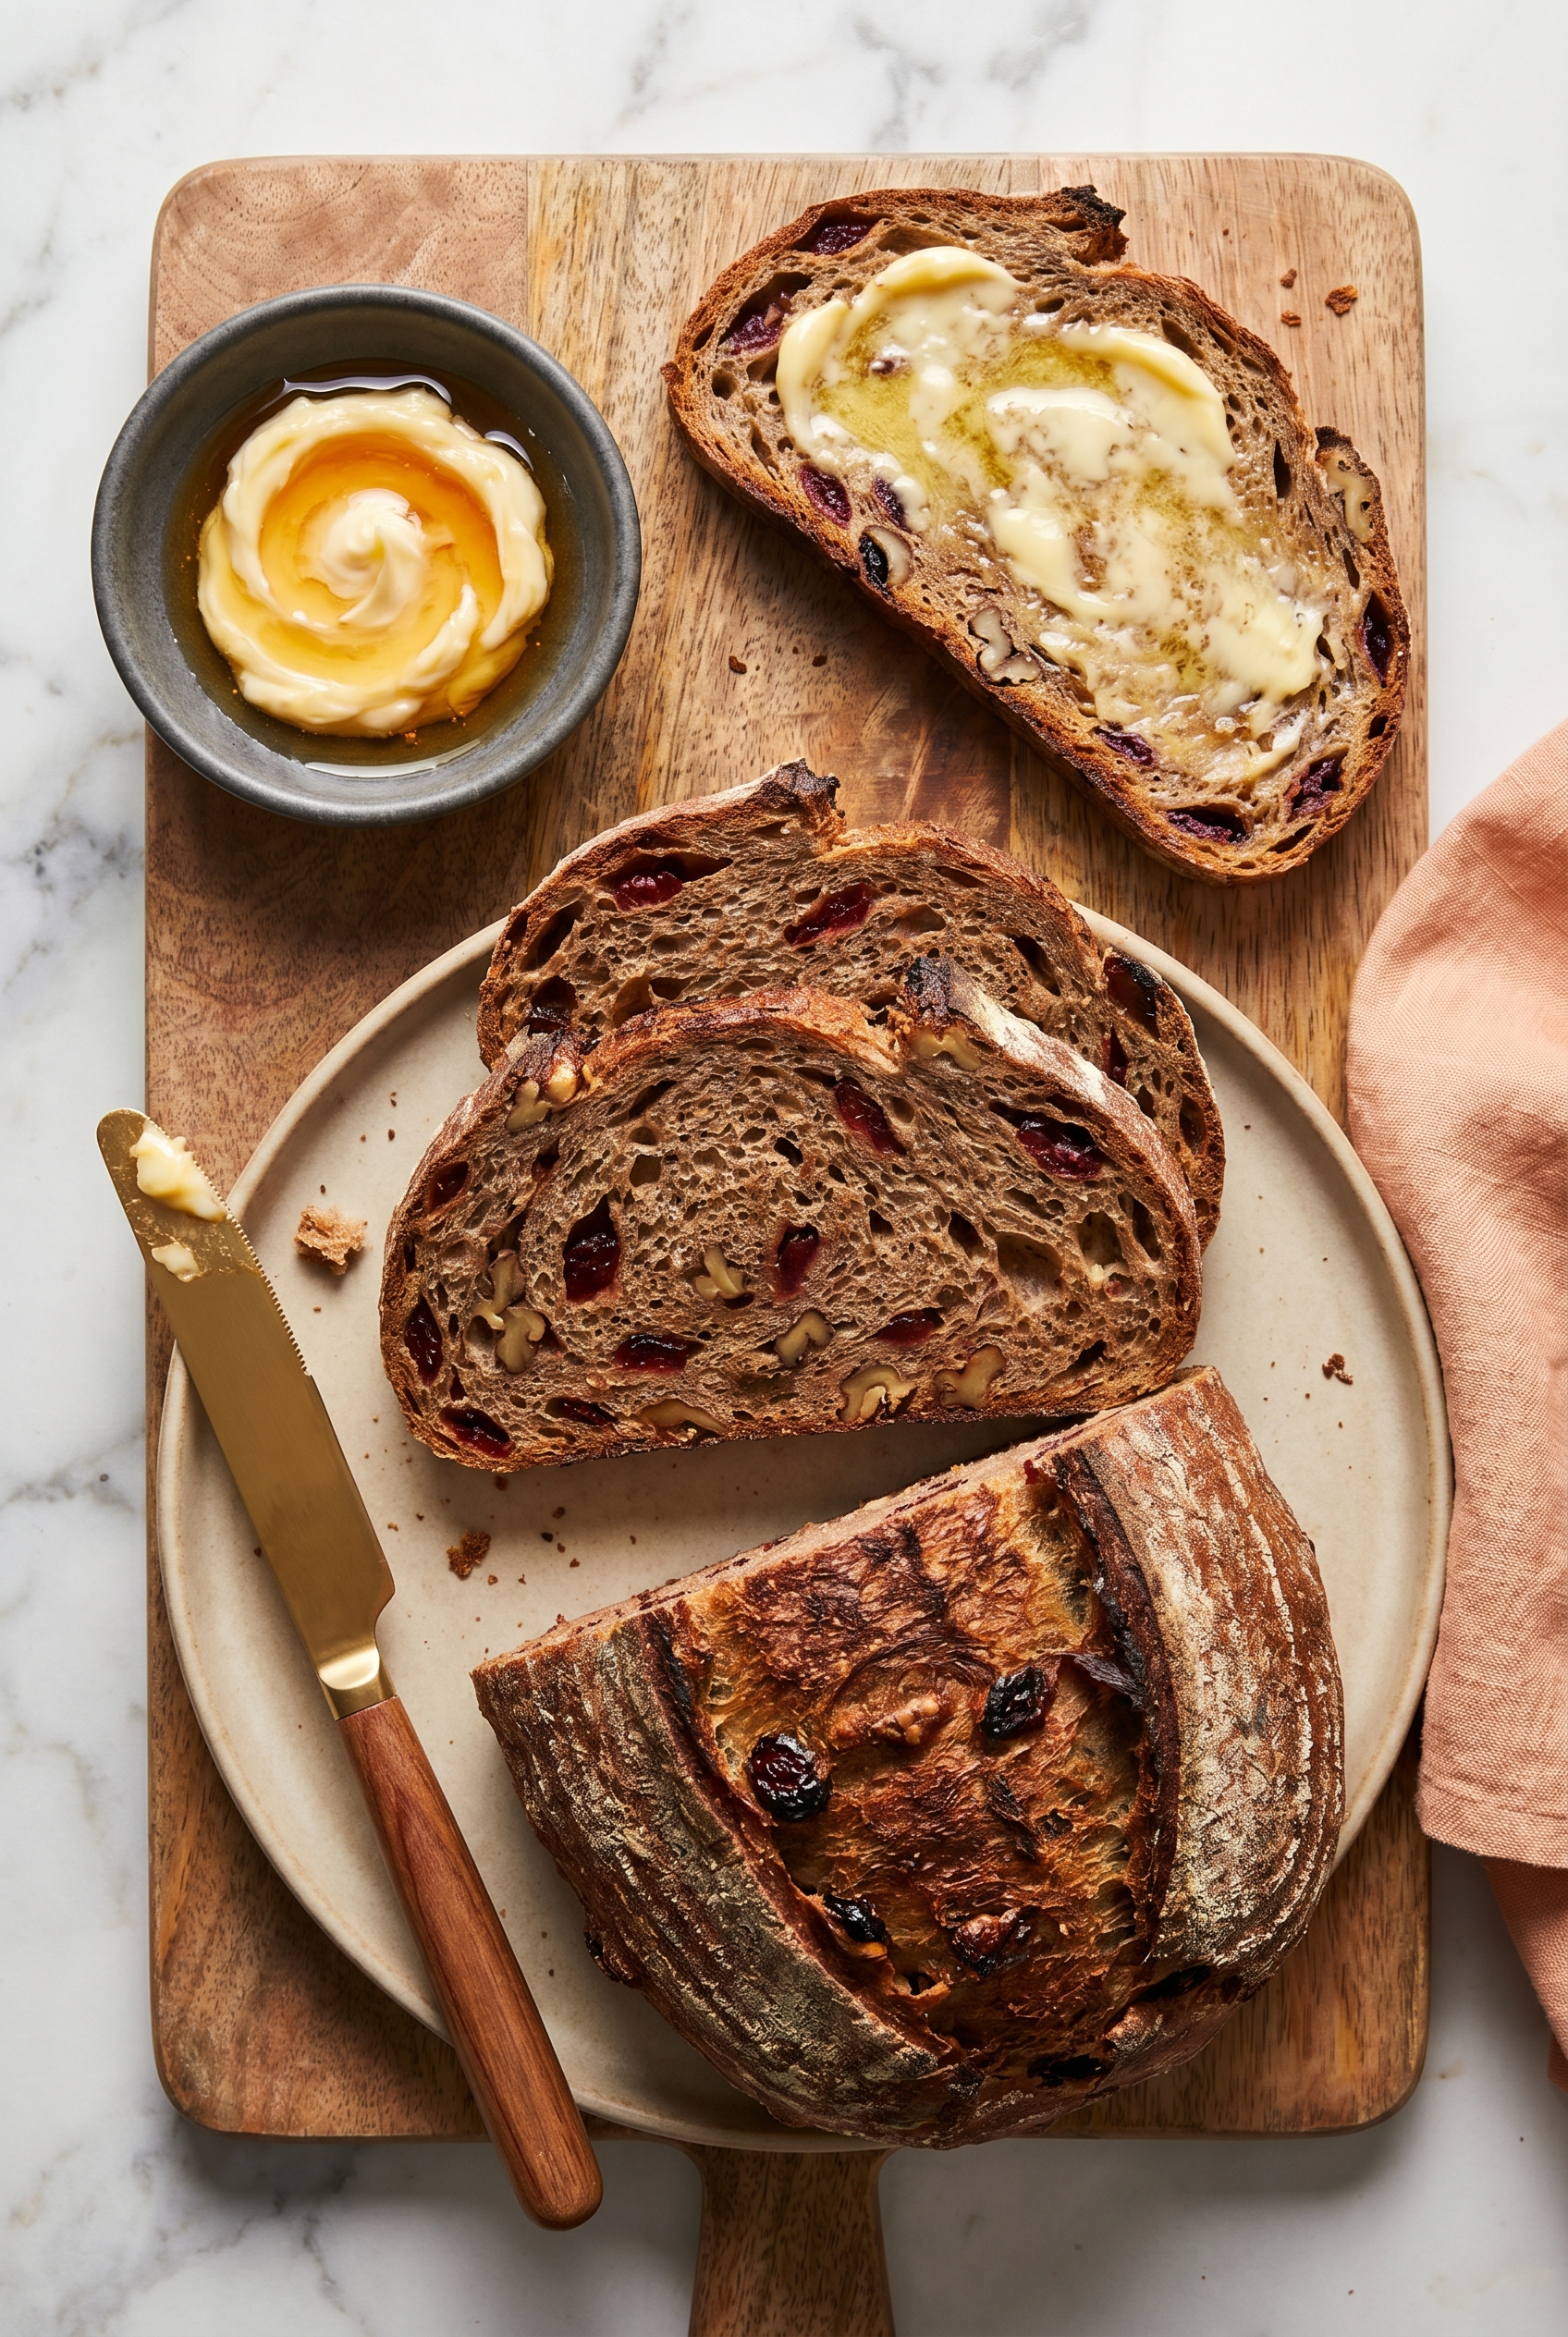
- Sweet and savory in one loaf. Dried cranberries and walnuts hit the exact balance between a breakfast slice with butter and a dinner side next to a cheese board.
Tools You’ll Need
Nothing fancy, I promise.
- Dutch oven with a lid. Cast iron works best. The lid traps steam during the first 25 minutes of baking, which creates the crusty bread crust steam baking effect that produces the signature crackle. Any heavy oven-safe pot with a tight lid substitutes in a pinch.
- Parchment paper. The only way to drop sticky high hydration dough into a 475°F pot without burning your hands or losing the shape you just spent thirty seconds creating.
- Large mixing bowl. The dough doubles in volume during fermentation. Choose the largest bowl you own so the risen dough doesn’t push the cover off overnight.
Ingredients
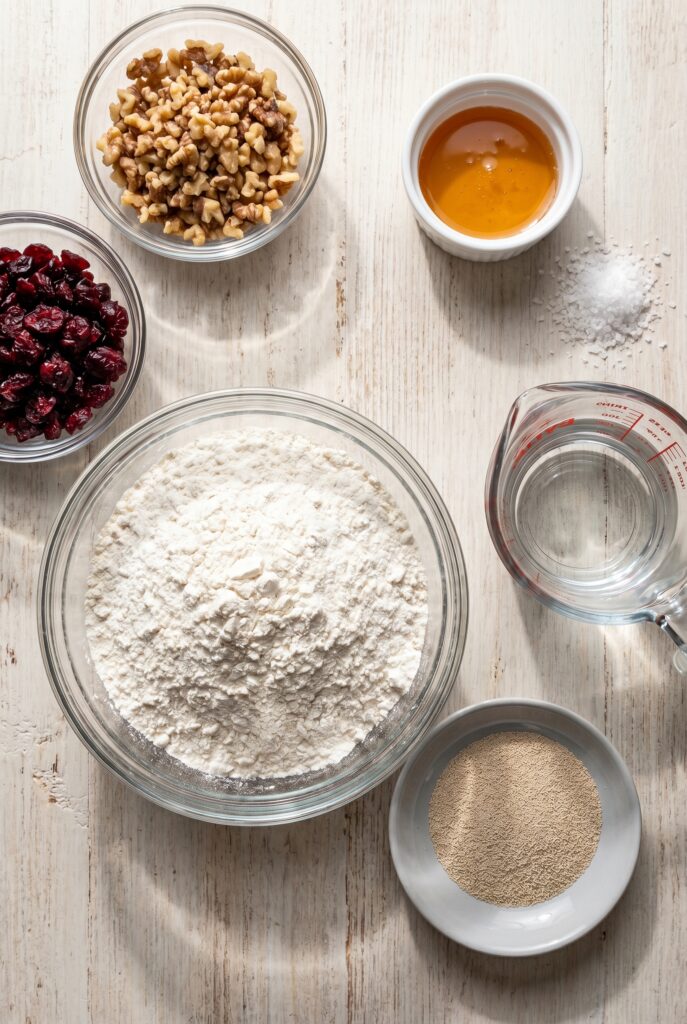
- 3 cups + 2 tablespoons bread flour Bread flour gives a better chew, but all-purpose flour works too. According to King Arthur Baking, bread flour has a higher protein content that creates a chewier, more structured crumb ideal for artisan-style loaves.
- 2 teaspoons coarse sea salt Avoid standard table salt; it can make the loaf taste metallic and overly salty.
- 1/2 teaspoon instant yeast Check the expiration date. Dead yeast is the #1 reason no knead bread fails.
- 3/4 cup roughly chopped walnuts or pecans No need for precision here.
- 3/4 cup dried cranberries Dried only. Fresh cranberries hold too much water and turn the dough into a swamp. Walnuts also add omega-3 fatty acids and plant-based protein, making every slice slightly more virtuous than it feels.
- 1 tablespoon honey Adds a hint of sweetness and gives the yeast an early energy boost.
- 1 1/2 cups warm water Around 95°F (35°C) — lukewarm, like a comfortable bath.
Instructions
Mix this up, go to sleep, and pretend you possess the soul of an old-world baker.
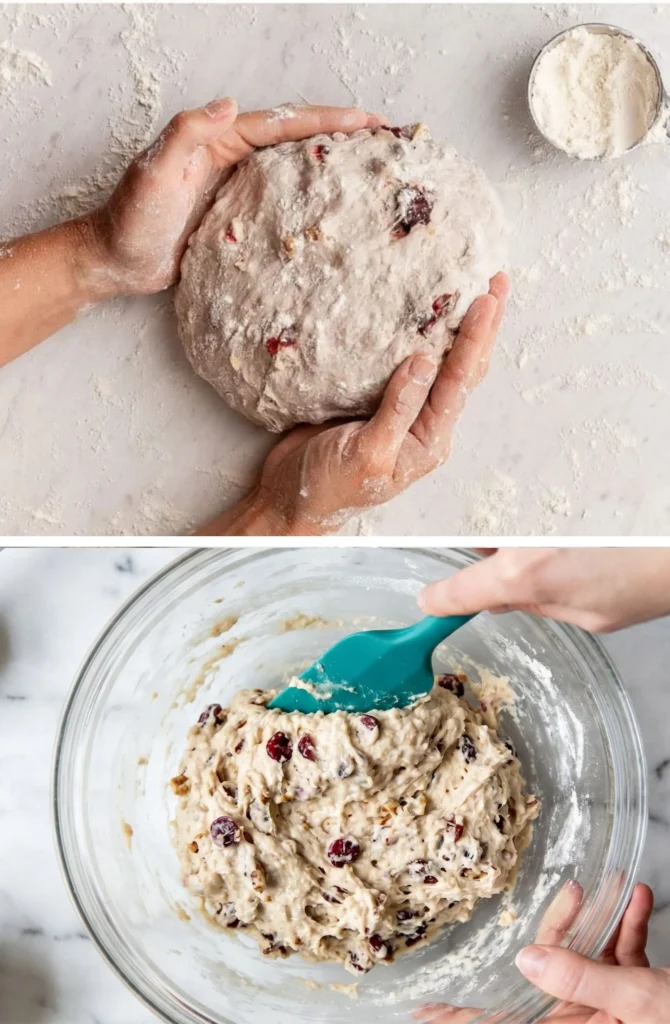
- Mix the dry and wet: In a large bowl using a silicone spatula, stir the flour, salt, yeast, nuts, and cranberries together. Mix the honey and water together, then pour on top and mix to combine. The dough will be incredibly sticky do not panic and add more flour, just trust the swampy process.
- Ignore it completely: Cover tightly and let it sit on the counter at room temperature for 12 to 18 hours. If you forget about it until hour 19, that is between you and the bread gods, it will still be fine.
- Shape and rest: Turn the sticky dough onto a floured surface, shape it into a messy ball with floured hands, and drop it onto a large piece of parchment paper. Score an X on top with a knife, cover lightly, and let it rest for 30 minutes while the oven preheats.
- Heat the pot: Put your Dutch oven (with the lid) into the oven and preheat to 475°F. Yes, that is terrifyingly hot, but it is exactly how you get that Crusty Cranberry Nut No Knead Bread texture.
- Bake: Carefully lift the parchment paper to drop the dough into the blazing hot pot, cover, and bake for 25 minutes. Remove the lid and bake another 8 to 10 minutes until golden brown do not burn your forearms on the oven door here.
- Cool before cutting: Remove from the pot and let it cool on a wire rack for at least 20 minutes. Cutting into it immediately will squish the crumb and ruin your hard work, so practice some self-control.
How to Make Artisan Bread Without Kneading: The Science in One Paragraph
Traditional bread recipes develop gluten through ten minutes of hand kneading. This no knead cranberry walnut bread recipe beginner method skips all of that by using time instead of force.
A long, slow fermentation at room temperature allows the flour proteins to hydrate fully and align themselves into gluten strands without any mechanical help. The result is an open, irregular crumb structure that looks like something a professional baker produced.
For a deeper understanding of how to make artisan bread without kneading, Serious Eats explains the gluten development science behind long-fermentation doughs in detail.
Bread Flour vs All-Purpose: Which Produces Better Results?
Bread flour produces a chewier, more structured crumb with better rise in this recipe. The higher protein content creates stronger gluten strands that hold more gas produced during fermentation and give the loaf its characteristic open holes.
All-purpose flour produces a softer, slightly denser crumb that still slices beautifully and tastes identical. Use bread flour when you want the most impressive crumb structure. Use all-purpose flour when bread flour isn’t in the pantry and you want easy homemade bread that looks bakery style without a special shopping trip.
♥ The Misfit Tips!
- Never add extra flour when the dough looks too wet. A sticky, shaggy dough is exactly right for a high hydration dough. Extra flour produces a dense, heavy loaf. Flour your hands before shaping and trust the process.
- Your kitchen temperature controls the rise time. A warm kitchen at 72°F produces a ready dough in 12 hours. A cold kitchen at 60°F needs closer to 18. Check for doubled volume and visible surface bubbles rather than watching the clock.
- Preheat the Dutch oven for the full 30 minutes. A lukewarm pot produces a pale, soft crust with none of the signature crunch. The pot walls need full temperature to flash-steam the dough on contact. Set a timer and walk away.
Perfect Pairings
This bread with dried cranberries and walnuts works beautifully alongside:
- A bowl of creamy butternut squash soup on a cold weeknight, where the sweet cranberry cuts through the savory richness
- Sliced on a holiday cheese board with goat cheese and a drizzle of honey, which makes it look like you spent the entire afternoon baking
How to Store
❤
- Counter. Up to 2 days wrapped loosely in a clean kitchen towel. A sealed plastic bag traps moisture and softens the crust overnight.
- Fridge. Up to 5 days in an airtight container. Slice before storing for easier grab-and-go access.
- Freezer. Up to 3 months. Slice the cooled loaf, freeze flat on a baking sheet until solid, then transfer to a freezer bag. Pull individual slices and toast directly from frozen.
- Reheat. Five minutes in a 350°F oven restores the crust crunch completely. The microwave works but softens the crust permanently

Crusty Cranberry Nut No Knead Bread
Ingredients
Equipment
Method
- Mix the dry and wet ingredientsIn a large bowl using a silicone spatula, stir together the flour, salt, instant yeast, walnuts, and dried cranberries. Mix the honey into the warm water, then pour it over the dry ingredients and stir to combine. The dough will be incredibly sticky do not panic, do not add more flour. Trust the swampy process. Do not use a stand mixer; this dough is too sticky and the method doesn't require it.
- Walk away completelyCover the bowl tightly with plastic wrap and let it sit at room temperature for 12 to 18 hours. The dough will double in size, cling to the bowl sides, and develop small air bubbles on the surface. If you forget it until hour 19, that's between you and the bread gods it will still be fine.
- Shape and restTurn the sticky dough onto a lightly floured surface. With floured hands, gently shape it into a rough ball it doesn't need to be perfect. Transfer the dough ball onto a large sheet of high-heat parchment paper. Score an X on top with a sharp knife or bread lame. Place the parchment-lined dough into a bowl so it holds its shape, cover lightly, and rest for 30 minutes while the oven preheats.
- Heat the Dutch ovenPlace your Dutch oven (with its lid) into the oven and preheat to 475°F (246°C). Yes, it's terrifyingly hot but this extreme heat is exactly what creates the crusty artisan bread texture you're after. Let the pot preheat for the full 30 minutes.
- BakeCarefully lift the parchment paper and lower the dough parchment and all into the blazing hot Dutch oven. Cover with the lid and bake for 25 minutes. Remove the lid and bake uncovered for an additional 8 to 10 minutes until deep golden brown. To test for doneness: tap the bottom of the loaf it should sound hollow or use an instant-read thermometer to confirm the center reads 195°F (90°C).
- Cool before slicingRemove the loaf from the pot and cool on a wire rack for at least 20 minutes. Slicing into hot bread collapses the crumb structure and turns the interior gummy. Practice self-control. It's worth it.