
Halloween baking is always more exciting when the treats are a little spooky and a lot of fun. These Gooey Monster Cookies are soft, colorful, and packed with playful Halloween charm, making them perfect for festive celebrations. I love making them because they bring a fun touch to the dessert table while still delivering that delicious homemade cookie flavor.
They are perfect for Halloween parties, family gatherings, school celebrations, or a cozy afternoon of baking. Whether you are making them with kids or simply want a fun seasonal treat, these monster cookies are sure to make Halloween a little sweeter.
Why You’ll Love This Recipe
- Cake Mix Shortcut: You do not have to measure flour or baking soda, which is a massive win when you are tired.
- Kid-Friendly: The kids can smash the eyeballs into the warm dough, keeping them occupied for at least six minutes.
- Stays Soft: The cream cheese keeps them incredibly tender for days, even if you accidentally leave them on the counter overnight.
- Highly Forgiving : If they bake a little lopsided, they just look like weirder monsters, which is the whole point.
Tools You’ll Need
Nothing fancy, I promise.
- Cookie scoop: A scoop creates similar portions so the cookies bake evenly.
- Hand mixer: A mixer beats the butter and cream cheese until smooth.
- Mixing bowls: Separate bowls hold the colored dough.
- Baking sheet: A standard metal sheet works well.
- Parchment paper: Parchment prevents sticking and simplifies cleanup.
- Wire rack: A rack cools the cookies before storage
Ingredients
- 1 box white cake mix. Use the dry mix without following the package instructions.
- 1/2 cup softened butter. Soft butter blends smoothly.
- 1/2 teaspoon vanilla extract. Vanilla adds extra flavor.
- 8 ounces softened cream cheese. Cream cheese creates the gooey texture.
- 1 large egg. The egg binds the dough.
- Powdered sugar. Powdered sugar coats the dough balls and creates the crinkle finish.
- Neon gel food coloring. Gel colors brighten the dough without adding much liquid.
- Candy eyeballs. Candy eyes complete the monster design
How To Make Gooey Monster Cookies
Do not let the neon colors intimidate you; this is basically just dumping things in a bowl and hoping for the best.
- Beat the wet ingredients: Beat the softened butter, vanilla, egg, and cream cheese until fluffy. If your cream cheese was still cold, you are going to have tiny white lumps—just pretend it is part of the monster aesthetic and move on.
- Add the cake mix: Mix in the white cake mix until a thick dough forms. The dough will be incredibly sticky, which is totally normal and not a sign that you ruined it.
- Color the dough: Divide the batter into bowls for the amount of colors you want, add food coloring to each, and mix until combined. I highly recommend using gel colors so you do not thin out the batter too much.
- Chill out: Chill the dough in the fridge for 30 minutes. Do not skip this, or you will be wrestling with neon slime instead of rollable cookie dough.
- Roll and coat: Roll the chilled dough into balls and dip them in a bowl of powdered sugar. If your hands look like a tie-dye experiment gone wrong by the end of this, you are doing it right.
- Prep for baking: Place the coated balls on a greased cookie sheet and pat them down just a tiny bit. They need a little help spreading out.
- Bake: Bake at 350 degrees for 10-12 minutes. They will look slightly underdone in the middle, but pull them out anyway—that is how they stay gooey.
- Add the eyes: Add the candy eyeballs while the cookies are still warm. Do not put the eyes on before baking unless you want them to melt into terrifying demonic puddles.
♥ The Misfit Tips!
- The Eyeball Incident: I once tried to bake the cookies with the candy eyes already on them. They melted into horrifying, burnt puddles of sugar. Always press the eyes in immediately after they come out of the oven while the dough is still warm.
- Sticky Situation: If you try to rush the chilling step, the dough will stubbornly stick to your palms. Give it the full 30 minutes in the fridge. If it gets warm while you are rolling, throw the bowl back in the fridge for a bit.
- Gel Over Liquid: Use neon gel food coloring instead of the liquid drops you buy at the grocery store. Liquid drops require you to use half the bottle to get a bright color, which messes up the dough texture. You can read up on how food coloring affects moisture if you want to get nerdy about it, but just trust me on the gel.
Perfect Pairings
These pair perfectly with absolute chaos and a sugar crash.
- A cold glass of milk, obviously.
- Strong black coffee for the adult who survived a room full of sugar-fueled children.
- A spooky movie marathon on a rainy October weekend.
- A lazy Halloween potluck where you want to look more prepared than you feel.
- Hot apple cider for a cozy fall drink.
How to Store
❤
- Fridge: Store baked cookies in an airtight container for three to five days.
- Freezer: Freeze baked cookies for up to three months.
- Unbaked dough: Freeze dough balls without powdered sugar for up to three months.
- Bake from frozen: Add one or two minutes to the baking time.
- Reheat: Microwave one baked cookie for five to eight seconds.
- Humidity note: Keep the cookies cool because candy eyes can bleed in warm, humid conditions.
- Stacking: Place parchment between layers to protect the decorations.
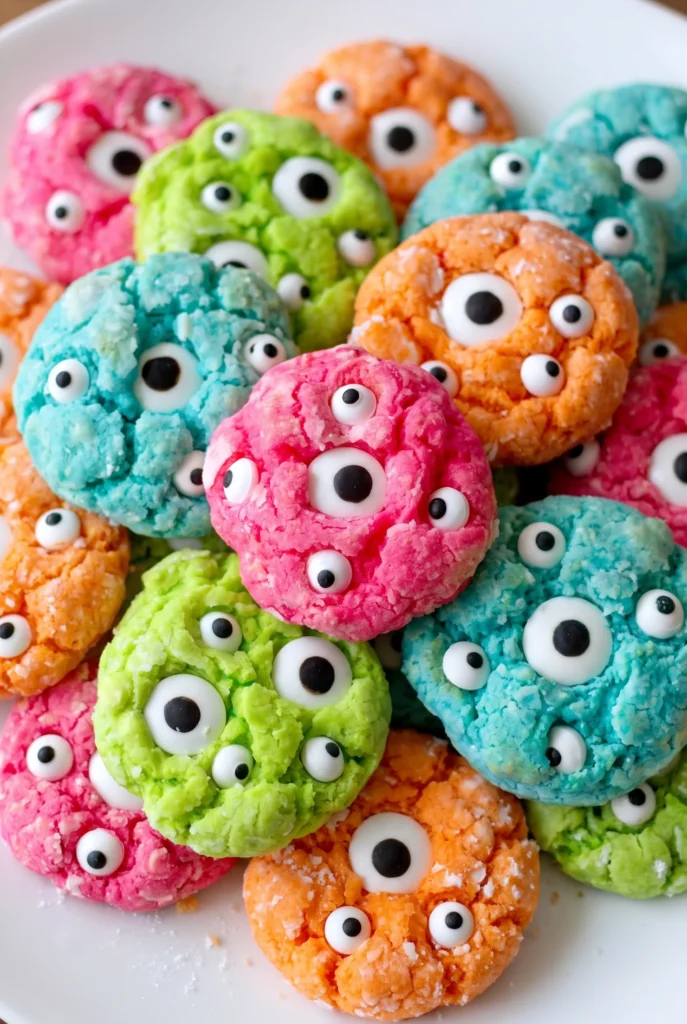
Gooey Monster Cookie
Ingredients
Equipment
Method
- Beat the Wet IngredientsBeat the softened butter, vanilla, egg, and cream cheese until light and fluffy. If the cream cheese is still cold and leaves a few small lumps, you can continue mixing as they will not affect the monster look.
- Add the Cake MixGradually mix in the dry cake mix until a thick, sticky dough forms. The dough should remain soft and slightly sticky.
- Color the DoughDivide the dough between bowls based on how many colors you want. Add neon gel food coloring to each portion and mix until evenly colored. Gel coloring works best because liquid food coloring can make the dough too thin.
- Chill the DoughRefrigerate the colored dough for 30 minutes. Chilling helps firm the dough so it is easier to roll and handle.
- Roll and CoatRoll the chilled dough into balls, then coat each one generously in powdered sugar. The dough will be sticky, so expect some colorful hands while shaping.
- Prepare for BakingPlace the coated dough balls on a greased or parchment-lined baking sheet. Gently flatten each ball slightly to encourage even spreading.
- Bake the CookiesBake at 350°F for 10–12 minutes. The centers may look slightly underdone when you remove the cookies, but they will continue to set as they cool.
- Add the EyesImmediately press candy eyeballs into the warm cookies. Add them after baking rather than before, as the heat can melt the candy and affect their appearance.