
I spent an embarrassing portion of my adulthood buying eight-dollar jars of fermented cabbage at the grocery store before I finally committed to a proper homemade kimchi recipe.
I believed fermentation required a chemistry degree, a dark cellar, or at minimum a mentor who looked disappointed in me while I worked. The reality is that learning how to make homemade kimchi requires salt, time, and the willingness to let vegetables sit on your counter until they become something genuinely extraordinary.
I once forgot about a batch for a full week and assumed I had destroyed it, but it turned out to be the best kimchi homemade style I had ever tasted. Here is exactly how I do it.
reader review
“Funky Funky and Funky in the absolute best way. I made this homemade kimchi recipe on a Saturday and by Monday night I had the most perfectly tangy jar of kimchi I have ever eaten in my life. The gochugaru paste coated every single piece of cabbage and the radish matchsticks stayed perfectly crunchy. I am never buying the store jar again.” – Jiyeon K.
Loved this too? Add your reviewWhy You’ll Love This Recipe
- Budget friendly. You save a significant amount compared to buying tiny grocery store jars, and a single batch fills a quart mason jar for under three dollars in ingredients.
- Total spice control. You set the heat level yourself, so nobody at the table encounters unexpected fire without warning.
- Deeply satisfying. Watching vegetables bubble and transform on your counter produces a specific, primal satisfaction that no store-bought jar can replicate.
- Long shelf life. A jar of homemade kimchi keeps for up to three months in the fridge, improving in complexity every week.
Tools You’ll Need
Nothing fancy, I promise.
- Large bowl : You need plenty of space to massage the cabbage until it gives up its water.
- Gloves: Buy some disposable kitchen gloves because rubbing chili paste with your bare hands is a mistake you only make once.
- Glass jar: A standard quart-sized mason jar works perfectly to hold your funky treasure.
Ingredients
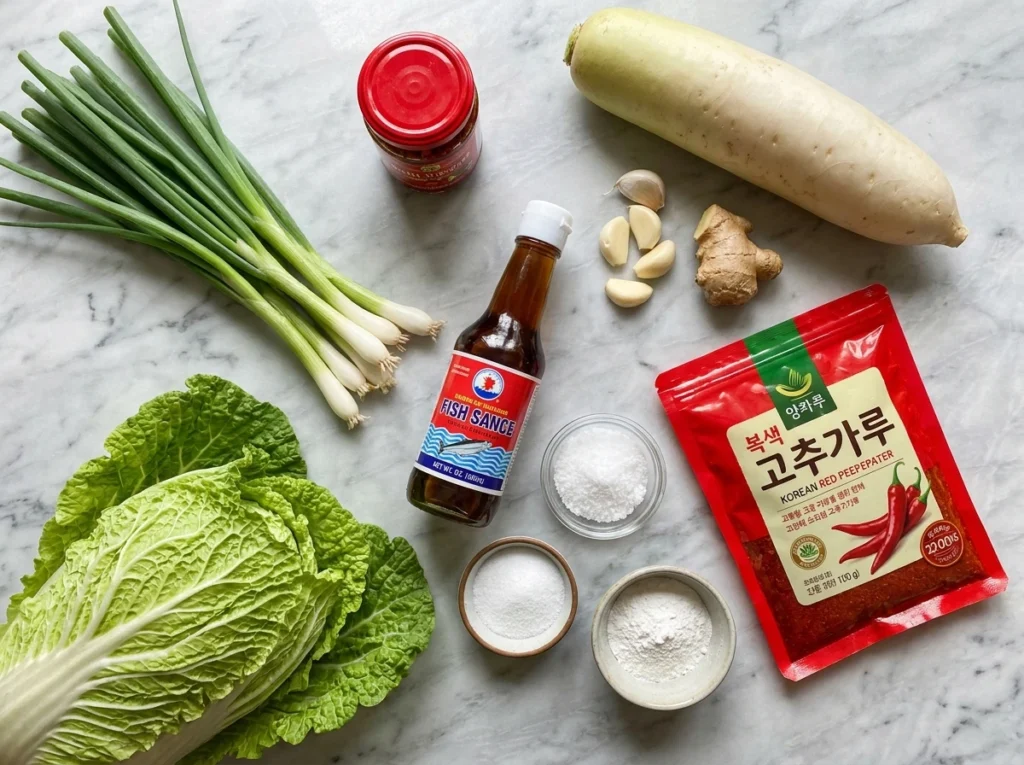
- 1 medium head napa cabbage (about 2 pounds) – The star of the show; it shrinks down drastically during the brining process.
- 1/4 cup iodine-free sea salt or kosher salt – Iodine can mess with the fermentation, so stick to pure salt.
- Water, preferably distilled or filtered – Chlorine kills the good bacteria we are trying to grow.
- 1 tablespoon grated garlic (5 to 6 cloves) – Brings that sharp, pungent bite, but do not go overboard or the whole batch turns bitter.
- 1 teaspoon grated peeled fresh ginger – Adds a warm background note, though too much makes the liquid weirdly sticky.
- 1 teaspoon granulated sugar – This provides direct food for the bacteria to eat so they can produce tangy lactic acid.
- 2 tablespoons fish sauce or salted shrimp paste (or 3 tablespoons water) – This brings the deep, savory funk that defines the dish.
- 1 to 5 tablespoons Korean red pepper flakes (gochugaru) – Start with 3 tablespoons unless you actively enjoy sweating through dinner.
- 8 ounces Korean radish or daikon radish, peeled and cut into matchsticks – Adds a great crunchy texture contrast to the soft cabbage.
- 4 medium scallions, trimmed and cut into 1-inch pieces – Because every savory side dish needs a little onion action.
Instructions
Do not let the waiting period scare you; the active work is mostly just aggressive vegetable massaging.
- Cut the cabbage: Cut the cabbage lengthwise through the stem into quarters, remove the cores, and chop crosswise into 2-inch strips. Do not chop it too small, or it turns into mush later.
- Salt the cabbage: Place the cabbage in a bowl, sprinkle with salt, and massage it with your hands until it softens. Add water to cover, weigh it down with a plate and a heavy can, and let it sit for 1 to 2 hours. If you skip the weight, the cabbage floats and does not brine evenly.
- Rinse and drain: Rinse the cabbage under cold water three times and drain in a colander for 15 to 20 minutes. Do not rush the draining, or your final product will be a watery mess.
- Make the spice paste: In a bowl, mix the garlic, ginger, sugar, fish sauce, and gochugaru into a smooth paste. This mixture is what fuels the lactic acid fermentation process.
- Combine the vegetables: Squeeze any lingering water out of the cabbage, then add it to the paste along with the radish and scallions. Seriously, squeeze it hard.
- Mix thoroughly: Put on your gloves and gently work the paste into the vegetables until everything is coated red. If you do this bare-handed and then rub your eye, you will regret your life choices immediately.
- Pack the jar: Shove the mixture into a 1-quart jar, pressing down hard so the liquid rises above the vegetables, leaving an inch of space at the top. The headspace is critical to prevent messy counter explosions.
- Let it ferment: Put a plate under the jar to catch the inevitable bubbly overflow, and leave it at room temperature out of direct sunlight. A little leakage just means the bacteria are doing their job.
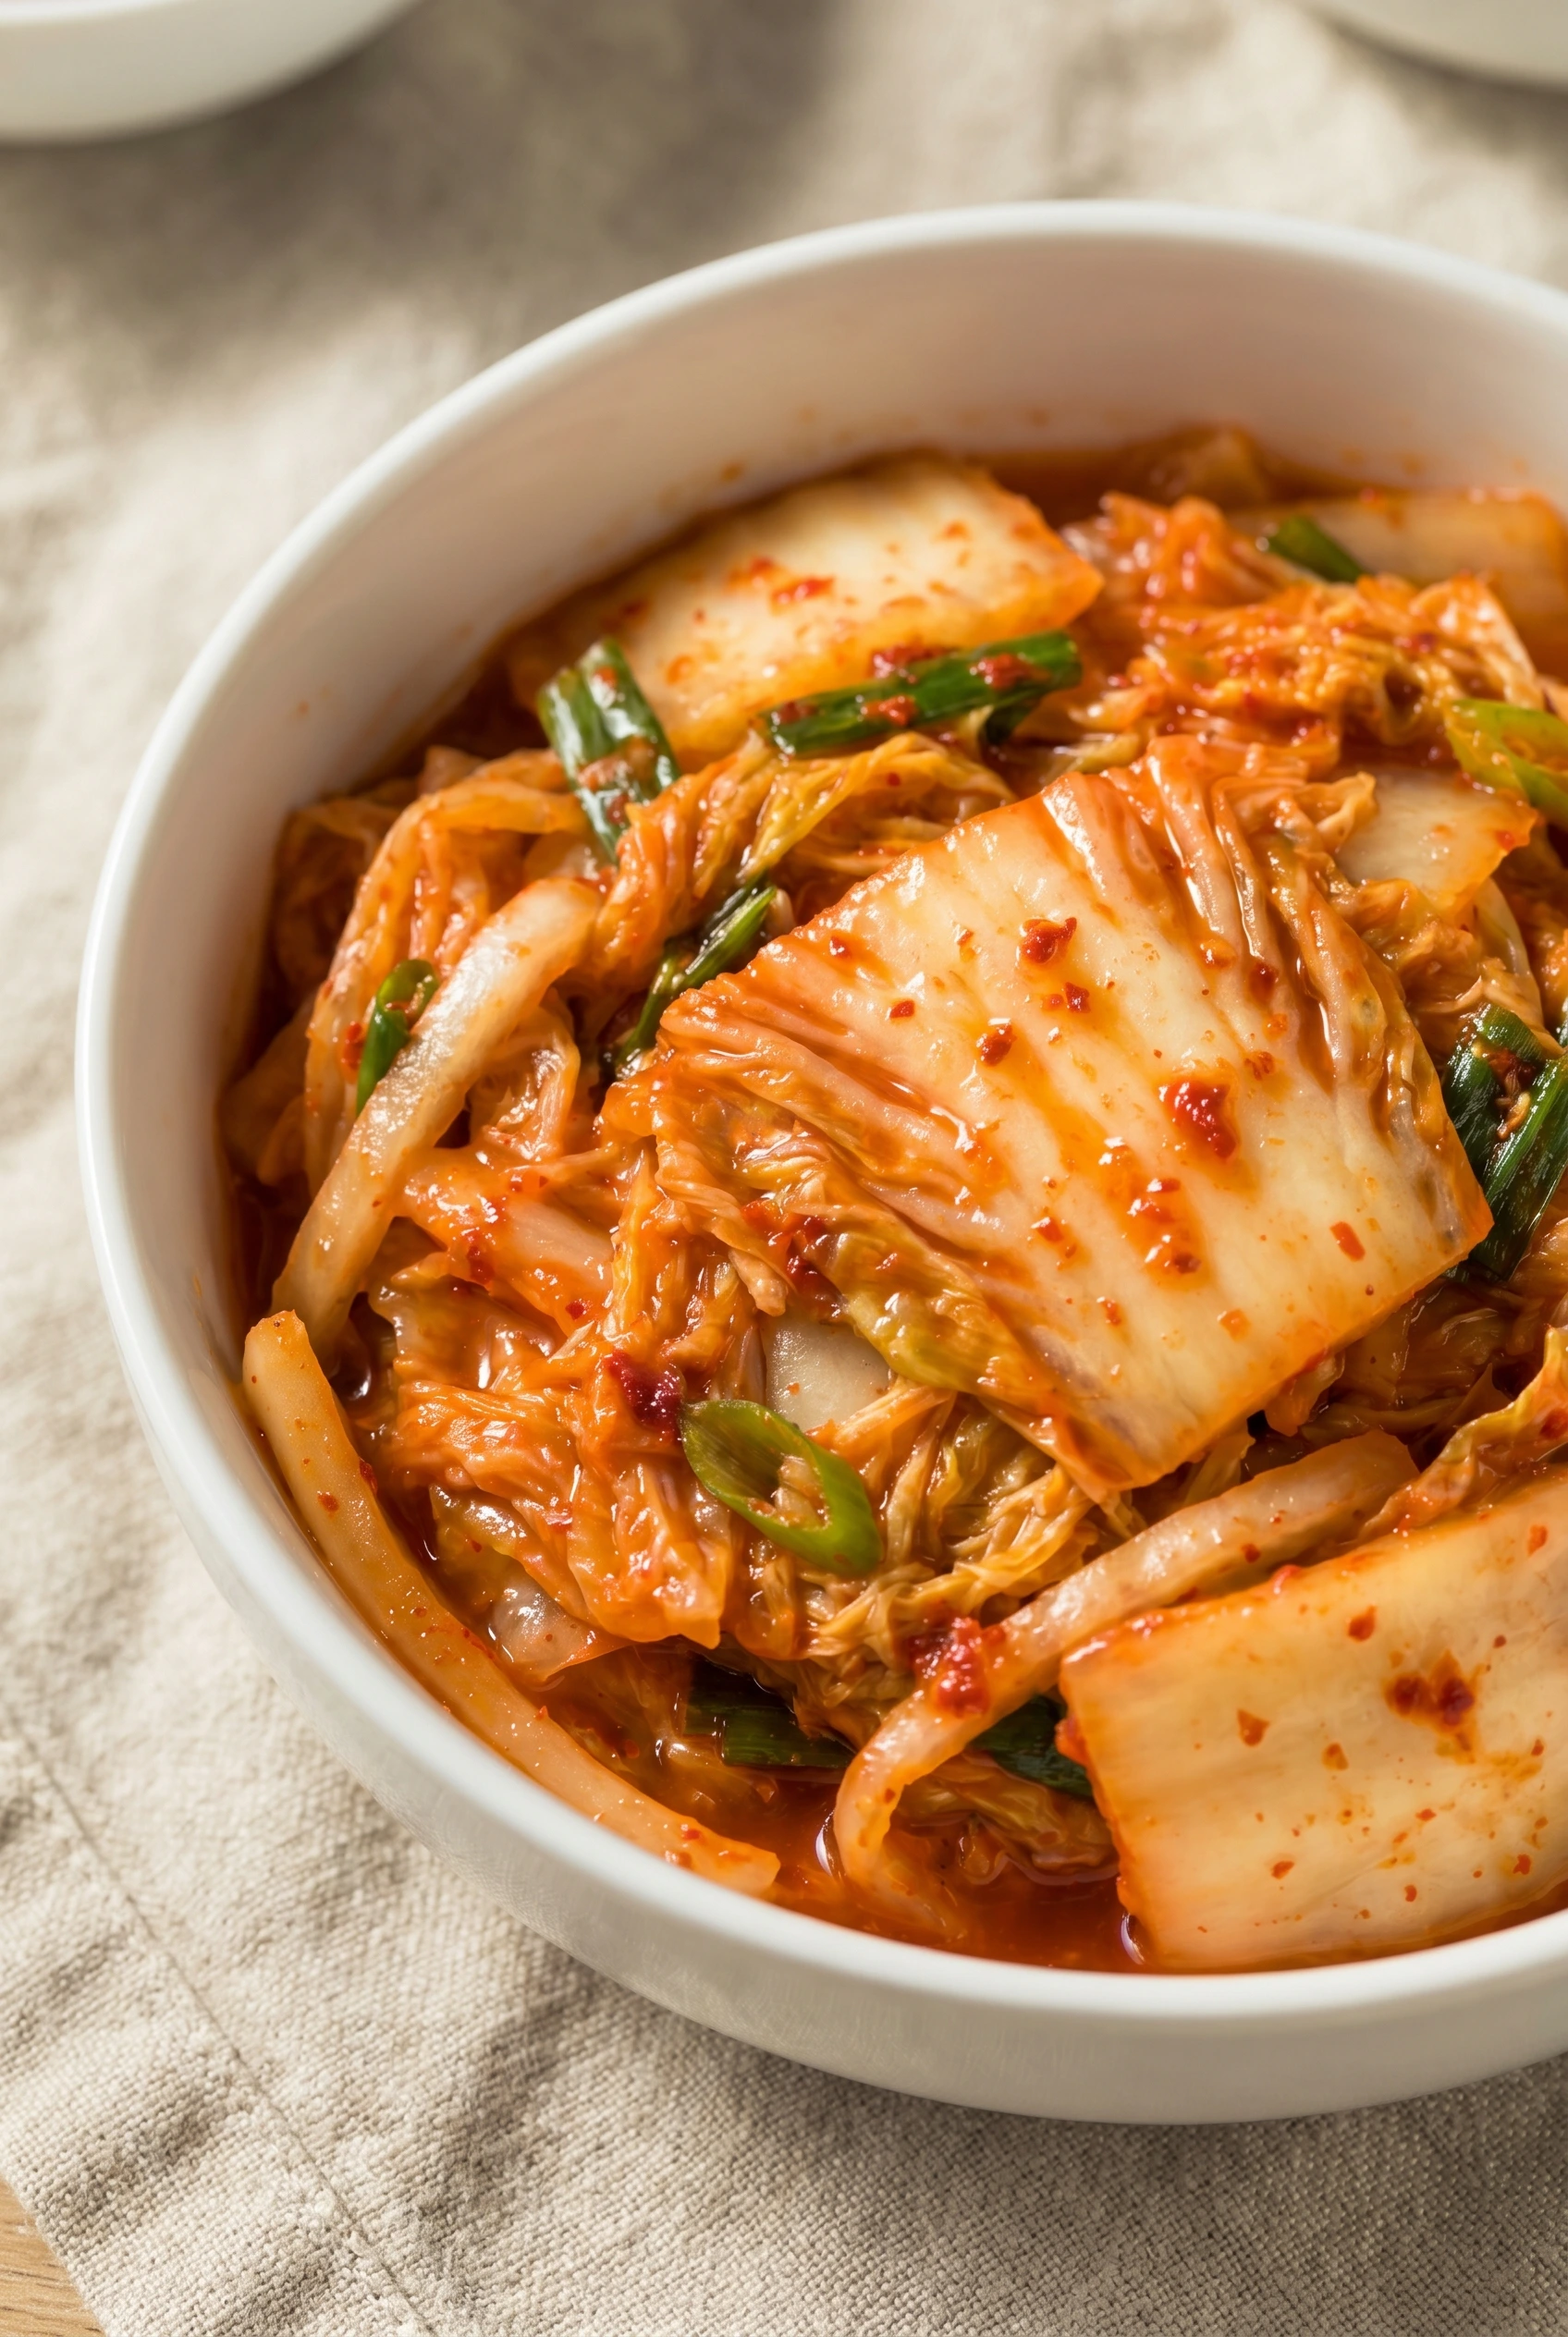
- Check and refrigerate: Open the jar once a day to press the vegetables back under the liquid and release the gas. Taste it daily, and once it is perfectly tangy, move it to the fridge to slow down the fermentation.
Seasoning and Taste as You Go
Fermentation moves at its own pace and your tongue tracks it better than any timer.
- Too flat. You leave the jar on the counter for one more day. The bacteria need time to produce enough lactic acid for tanginess to develop.
- Too salty. You rinsed the cabbage too lightly after the brine stage. You use the over-salted batch in fried rice or a kimchi jjigae soup where the cooking liquid dilutes the excess salt. You rinse more aggressively next time.
- Needs depth. A vegetarian version using water instead of fish sauce will taste cleaner but flatter. You add a pinch of kelp powder or a small piece of kombu to the paste next time.
♥ The Misfit Tips!
- Rinse aggressively. I once gave the brined cabbage a polite rinse and spent the next week eating something that tasted like a salt block. Three full rinses with your hands working through the leaves each time is the minimum.
- Leave headspace in the jar. I packed a jar to the very brim once, went to bed, and woke up to a counter covered in red garlic-scented paste that had migrated to three different surfaces. One inch of headspace at the top is non-negotiable.
- Use distilled water. A one-dollar gallon of distilled water protects your entire batch from the chlorine in tap water that can slow or stall fermentation entirely.
Make It Yours
- Different vegetables. You apply the same paste and salting process to cubed daikon radish to make kkakdugi, a crunchy radish kimchi that ferments slightly faster than napa cabbage.
- Vegetarian or vegan version. You replace the fish sauce with three tablespoons of water mixed with half a teaspoon of kelp powder. The result tastes clean and spicy with slightly less funky depth.
- Spice level. You start at one tablespoon of gochugaru for a mild batch and work up to five tablespoons once you understand how fermentation concentrates heat over time. Three tablespoons suits most palates on the first attempt.
- Low-carb and gluten-free. This recipe contains no gluten ingredients, but you check the fish sauce label to confirm no wheat-based additives appear in the ingredient list.
Troubleshooting Guide
- Problem: the jar is bubbling and leaking.
- Why it happened: You packed the jar too full and the fermentation gases pushed the liquid over the rim.
- Fix it: You set a plate under the jar immediately, open the lid to release the gas pressure, press the vegetables back below the brine line, and pour out a small amount of liquid if the jar still feels too full.
- Problem: the cabbage turned mushy.
- Why it happened: The kitchen ran too warm during fermentation, which accelerated bacterial activity and broke down the cabbage cell walls faster than normal.
- Fix it: You cannot restore the crunch, but the mushy batch still tastes good in kimchi fried rice or kimchi jjigae soup where a soft texture suits the dish.
- Problem: the kimchi tastes bland after three days.
- Why it happened: The kitchen temperature sits too low, which slows bacterial activity significantly.
- Fix it: You move the jar to a warmer spot, at least 65°F, and leave it for one to two more days. Fermentation depends entirely on temperature.
Perfect Pairings
This kimchi fits into almost every meal, but a few combinations stand out.
- Steamed short-grain rice soaks up the spicy, funky brine and turns a bowl of kimchi into a complete meal with almost no effort.
- A crispy fried egg with a runny yolk cuts through the sharp acidity and adds richness that balances the heat.
- A cold, crisp lager cools your mouth between bites when you eat more than you planned to, which happens every time.
A lazy weeknight with nothing but rice in the pot and a jar of this in the fridge produces a better dinner than most people expect.
How to Store Kimchi
❤
- Fridge. You keep the sealed glass jar in the refrigerator for up to three months. The cold slows fermentation without stopping it, and the flavor sharpens and deepens week by week.
- Freezer. You skip the freezer. Freezing destroys the crunch completely and kills the live bacterial cultures that make kimchi worth eating.
- Cooking with older batches. You toss over-fermented, very sour kimchi into a hot skillet for fried rice, into a pot for kimchi jjigae, or onto a pancake batter to make kimchijeon. Older kimchi suits cooked applications better than fresh.
- Container note. You always store kimchi in glass jars. Plastic containers absorb the garlic and gochugaru smell permanently and transfer it to everything else stored nearby.
How To Make Easy Cabbage Kimchi
Ingredients
Equipment
Method
- Cut and salt the cabbageYou cut the napa cabbage lengthwise through the stem into quarters, remove the dense cores, and chop each quarter crosswise into two-inch strips. Strips this size soften during brining but retain enough structure to hold their shape through fermentation. You place all the cut cabbage in your large bowl, sprinkle the kosher salt evenly over the top, and massage it into the leaves with both hands until the cabbage begins to soften and release liquid. You add enough filtered water to cover the cabbage, set a plate on top, and weigh it down with a heavy can so every piece stays submerged in the brine. You let it sit for one to two hours.
- Rinse and drainYou rinse the brined cabbage under cold running water three full times, working your hands through each rinse to flush the salt from between the leaves. Under-rinsing produces a final product so salty it hurts to eat. You transfer the rinsed cabbage to a colander and leave it to drain for fifteen to twenty minutes, then squeeze large handfuls firmly to press out as much remaining water as possible. Wet cabbage dilutes the paste and produces a thin, watery brine that never develops full flavor.
- Make the spice pasteYou combine the grated garlic, grated ginger, sugar, fish sauce, and gochugaru in a bowl and stir them into a uniform paste. The mixture looks intensely red and smells like the best thing you have ever encountered in a kitchen. The sugar dissolves into the paste at this stage and starts feeding the fermentation bacteria the moment it contacts the cabbage. You adjust the gochugaru at this point if you want a milder or spicier batch. According to Healthline, gochugaru contains capsaicin, which provides the heat, along with antioxidant compounds that contribute to the documented health benefits of fermented kimchi.
- Combine and coatYou put on your kitchen gloves before you touch the paste. You add the drained cabbage, radish matchsticks, and scallion pieces to the bowl with the paste. You use gloved hands to work the paste into every surface of every vegetable, rubbing it through the cabbage leaves and coating each radish piece until the entire bowl turns uniformly red. You taste a strand of cabbage and adjust the heat or salt before packing the jar.
- Pack the jar and start fermentationYou grab handfuls of the coated mixture and press them firmly into the quart mason jar, pushing each layer down with your fist so the liquid rises above the vegetables as you pack. You leave one inch of clear headspace at the top of the jar. Packing it to the rim guarantees an overflow on your counter by morning. You place the sealed jar on a plate to catch any bubbling liquid and set it at room temperature away from direct sunlight.
- Check daily and refrigerate when readyYou open the jar once a day and press the vegetables back below the liquid line with a clean spoon or gloved finger. This step releases the fermentation gas that builds inside the jar and prevents pressure from pushing the brine over the top. You taste a small piece each day starting on day two. The kimchi tastes salty and raw on day one, mildly tangy on day two, noticeably sour and funky on day three. You move the jar to the refrigerator when it reaches the tang level you prefer. Most batches reach their peak flavor between two and five days at a kitchen temperature of 65°F to 75°F.