
Twelve egg whites, a tube pan, and the firm belief that I could figure it out on a Tuesday night produced my first completely failed angel food cake recipe and, two attempts later, my most requested dessert.
This easy angel food cake recipe builds a towering, cloud-like sponge from egg whites, sugar, and cake flour with zero fat and zero complicated technique once you understand two rules: the pan stays ungreased, and the egg whites reach soft peaks only.
The result looks like something from a bakery display case and costs less than four dollars to make. Here is exactly how I do it.
Why You’ll Love This Recipe
- Zero fat in the batter. The entire cake runs on egg whites, sugar, and cake flour, which means a generous slice carries significantly fewer angel food cake calories than any butter-based dessert of equivalent size.
- Pantry staples throughout. Aside from the volume of eggs required, every ingredient in this recipe lives in a standard baking pantry at all times.
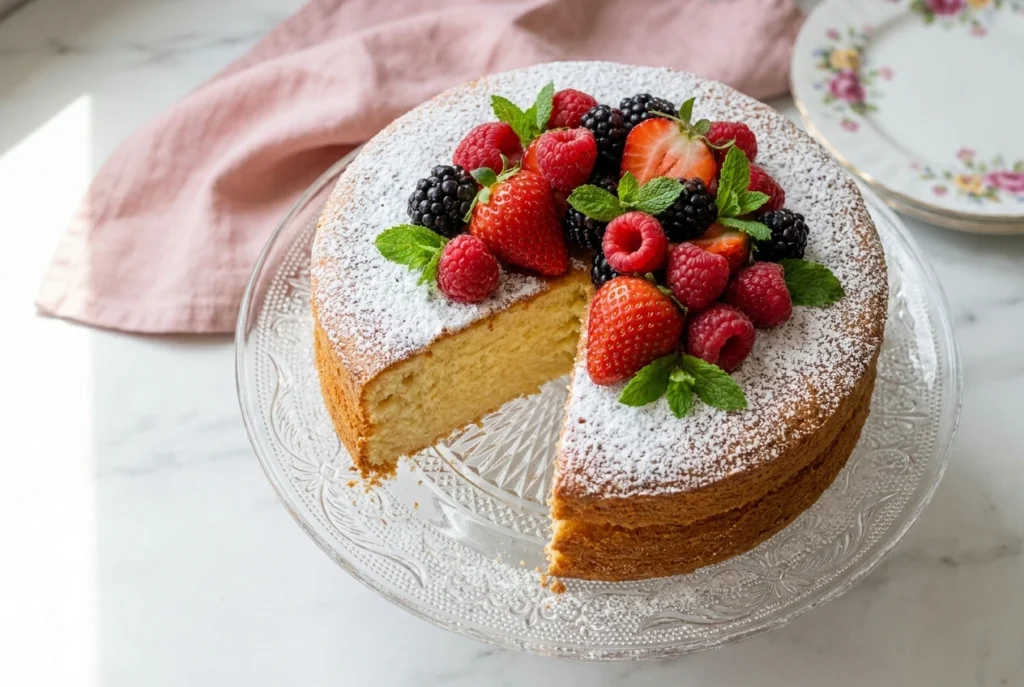
- Crowd-pleasing appearance. A tall white sponge dusted with powdered sugar looks impressive before anyone takes a bite. Nobody declines a dessert that looks like an edible cloud.
- Genuinely budget-friendly. Eggs, sugar, and cake flour produce one of the most visually dramatic desserts in the baking repertoire for under five dollars total.
Perfect Pairings
This angel food cake with strawberries combination stands as the most classic serving option, but two preparations work best:
- Fresh berries macerated in one tablespoon of sugar for thirty minutes, which draws out their juice and produces a natural strawberry sauce for angel food cake that pools around each slice
- A heavy dollop of freshly whipped cream and a smear of lemon curd to use up the twelve egg yolks now sitting in a bowl on your counter
Tools You’ll Need
Nothing fancy, I promise.
- tube pan – You absolutely need this specific pan. A bundt pan will ruin your life and your cake because you cannot cut it out properly.
- Food processor – To blitz your regular sugar into superfine sugar.
- Stand mixer – Technically you can use a hand mixer, but your arm will fall off after five minutes.
Ingredients
- 1¾ cups granulated sugar – We are going to blend this down, so do not try to substitute powdered sugar.
- 1 cup cake flour – Do not use all-purpose flour unless you want a dense, bread-like situation.
- ½ teaspoon salt – Just basic salt to balance the sugar.
- 1½ cups large egg whites – About 10 to 12 eggs. Separate them cold, let them come to room temp.
- 1½ teaspoons cream of tartar – This stabilizes the egg whites so they do not collapse into a sad puddle.
- 1½ teaspoons vanilla extract – Because we want it to actually taste good.
Instructions
Take a deep breath, channel your inner baking show contestant, and remember that egg whites can smell fear.
- Prep the oven: Position an oven rack in the bottom third of your oven and preheat the oven to 350°F. Have a 9 or 10-inch ungreased tube pan (16-cup capacity) ready. Do NOT grease it, or the cake will slide right down the sides and collapse.
- Blitz the sugar: Place the sugar in a food processor and blend until the sugar is very finely ground, about 1 minute. Remove 1 cup of the fine sugar (200g), leaving the rest in the food processor.
- Mix flour and sugar: To the food processor, add the cake flour and salt. Pulse 10 times.
- Sift the reserved sugar: Set a fine mesh sieve over a medium bowl. Sift the reserved 1 cup of fine sugar into the bowl. Discard any large grains caught by the sieve – if you skip sifting, your cake will have weird crunchy pockets, which is nobody’s idea of a good time.
- Sift the flour mixture: Place the same sieve over a separate large bowl and add the sugar and flour mixture. Sift the sugar and flour together into the large bowl and set aside.
- Whip the egg whites: In a clean, large mixing bowl, combine the egg whites and cream of tartar. Use an electric hand mixer or a stand mixer fitted with the whisk attachment and beat the egg whites on low speed until they turn frothy on top, about 1 minute.
- Add sugar to whites: Once the egg whites become frothy, increase the speed to medium and sprinkle the reserved 1 cup of fine sugar 1 tablespoon at a time into the egg whites. Once the sugar is incorporated, beat the egg whites until soft, glossy peaks form. This will take about 5 minutes overall. Add the vanilla and beat on low speed just until incorporated. If you go to stiff peaks, your cake will not rise in the oven, so stop when it looks like a soft, floppy cloud.
- Fold gently: Sift a third of the flour and sugar mixture over the egg whites and gently fold in the dry ingredients with a spatula. Repeat two more times. Be gentle here, you are folding, not aggressively stirring a pot of chili.
- Fill the pan: Transfer the batter to a clean, ungreased tube pan. Smooth the top and clean off the sides of the pan. Gently tap the pan on the counter a few times or run a knife or skewer through the batter to help break up any large air bubbles that may have gotten trapped.
- Bake: Bake for 35 to 40 minutes or until the cake is golden brown and a skewer inserted in the center comes out clean.
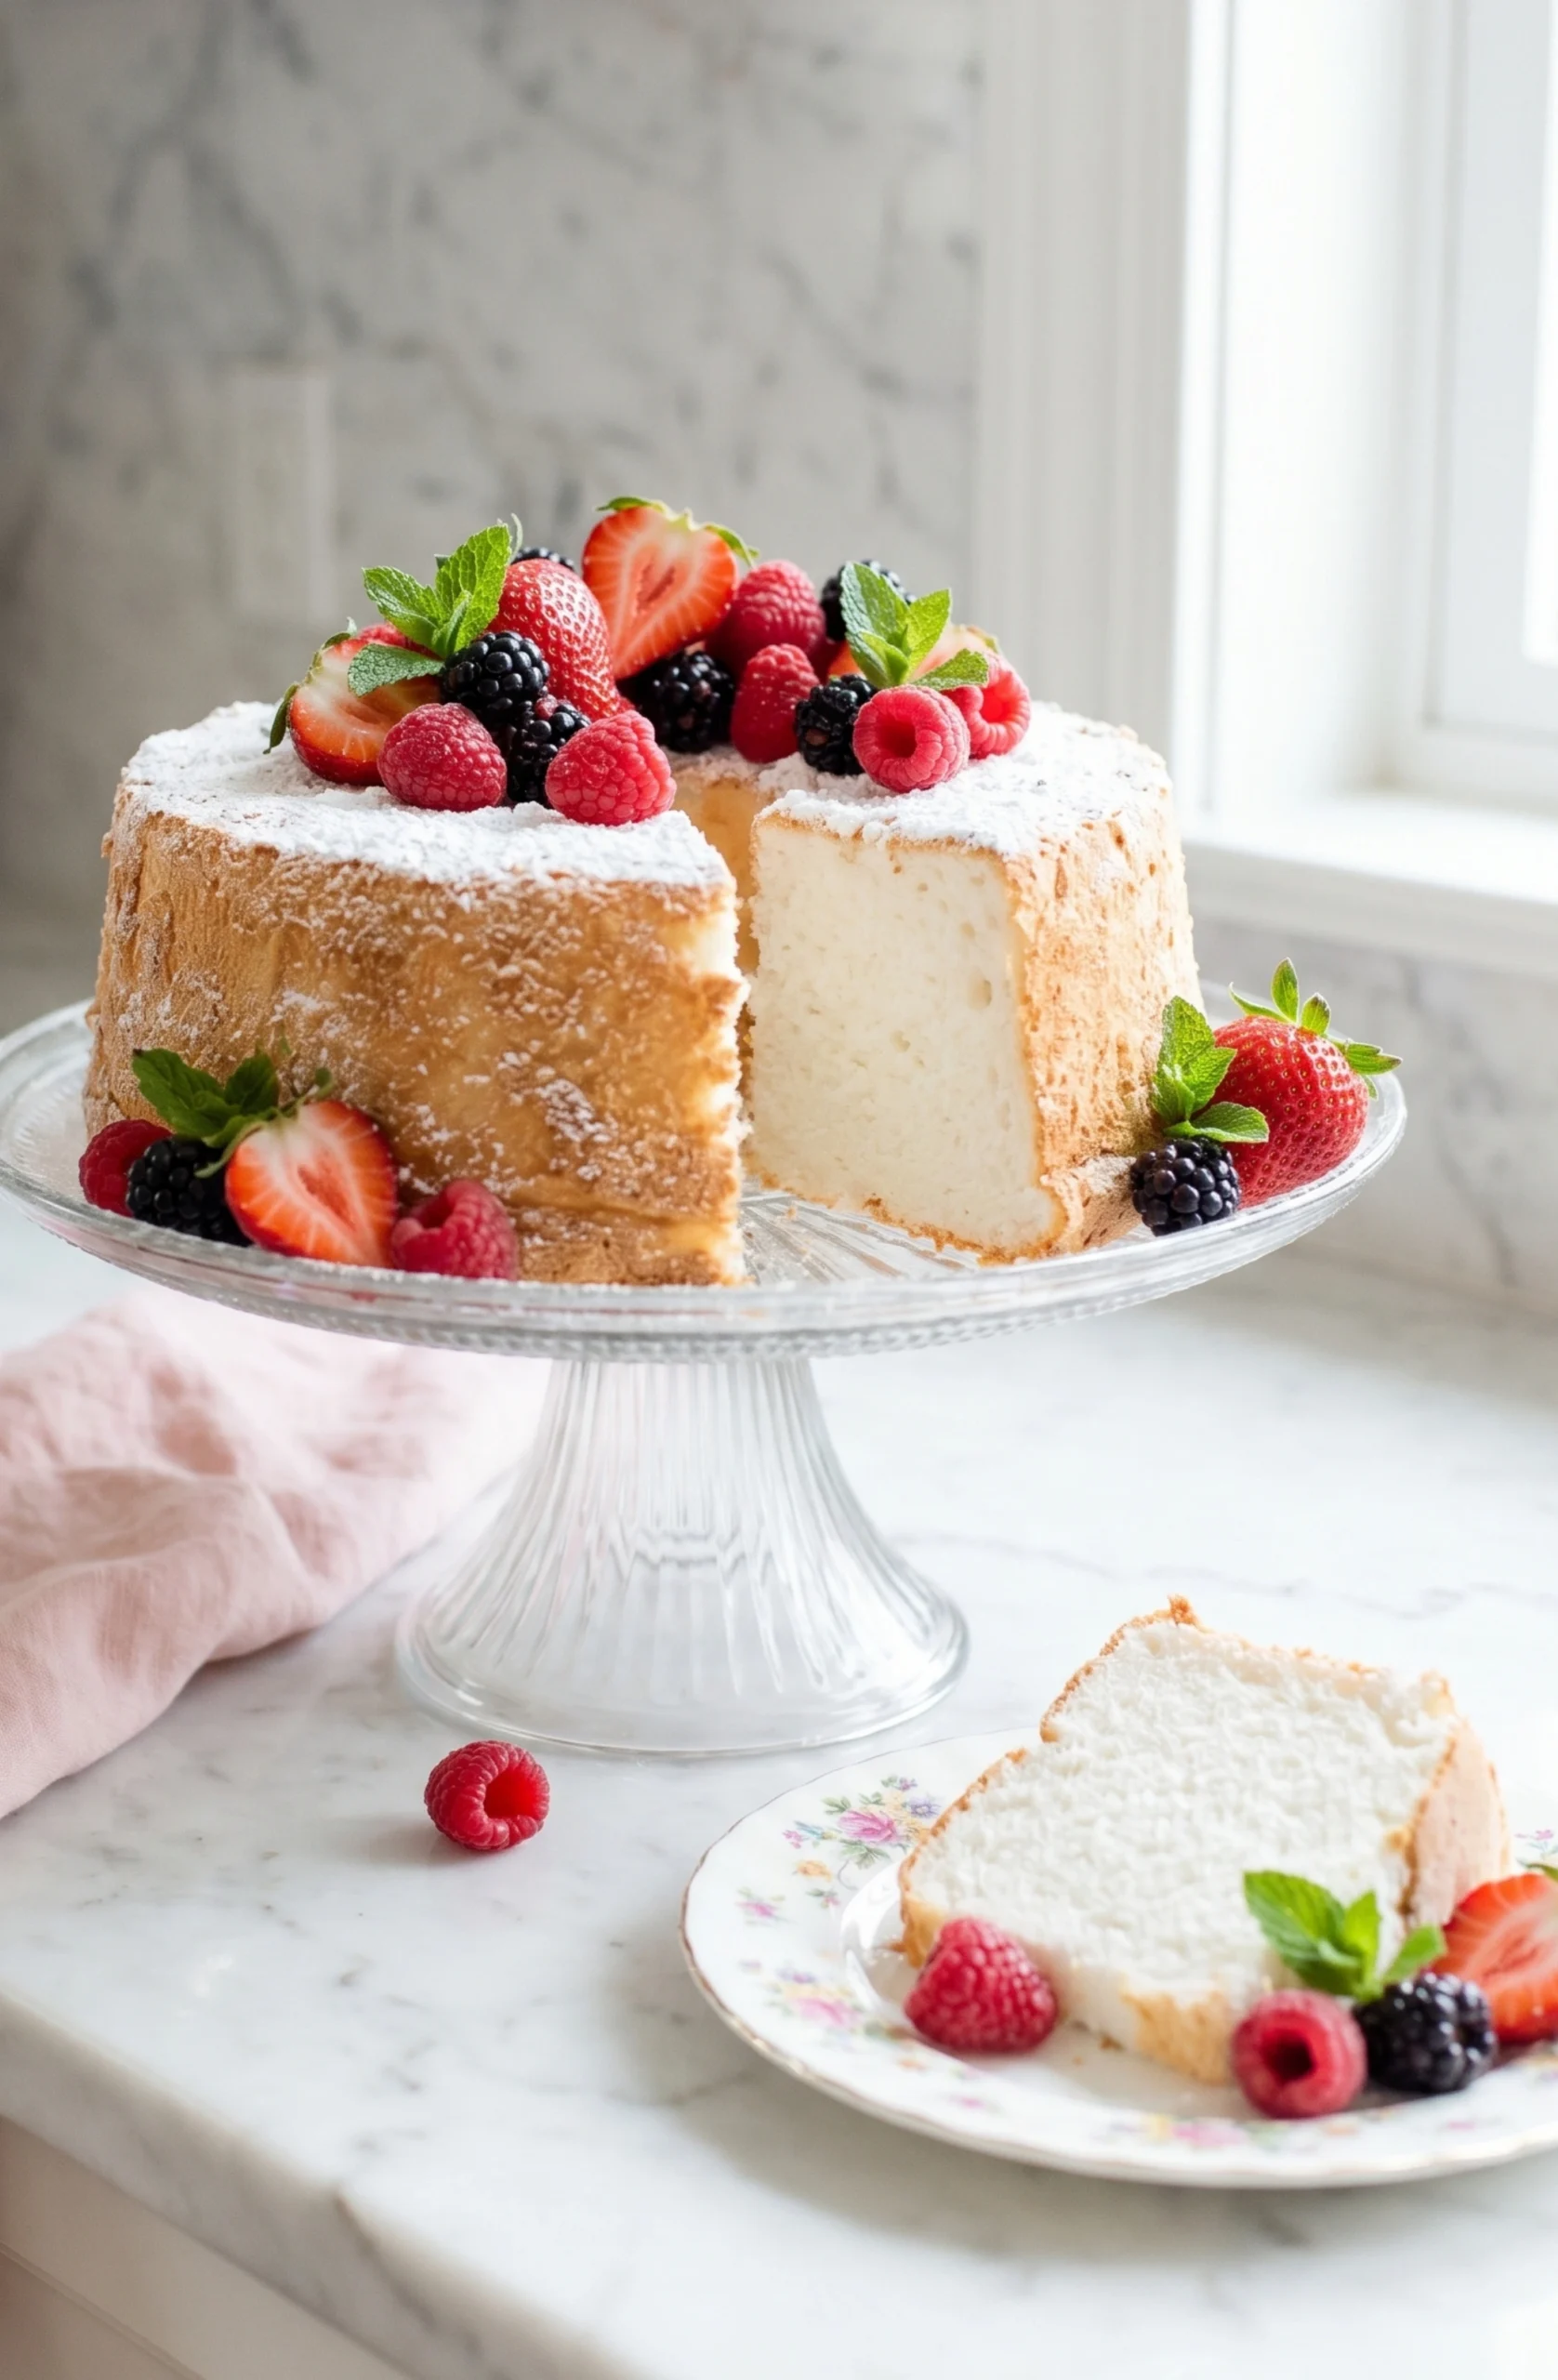
- Cool upside down: Invert the pan onto the counter and allow the cake to cool upside-down in the pan for at least 1 hour. Most angel food cake pans have feet at the top so the cake can cool upside down but if yours doesn’t just invert onto a wire rack. This looks insane, but if you cool it right-side up, gravity will crush your beautiful cake into a dense disk.
- Remove and serve: Once the cake is completely cooled, run a thin knife along the outer edge between the cake and the pan, and around the center tube, then pull the center-piece out to remove the cake. Run the knife along the bottom of the pan and invert onto a cake stand. Place the cake on a serving plate and dust with powdered sugar, if desired.
♥ The Misfit Tips!
- Separate Every Egg Into a Small Bowl First. I dropped a tiny speck of yolk into the main measuring cup on egg eleven and thought it wouldn’t matter. The whites sat in the mixer for eight minutes and produced nothing but frothy liquid. One drop of fat collapses the foam before it even starts. Crack each egg into a separate small bowl, confirm the white is clean, then transfer it. Thirty extra seconds saves a dozen eggs.
- Never Grease the Pan. Every baking instinct says to butter the pan before adding batter. For angel food cake, that instinct produces a flat, collapsed disk. The batter needs to grip the dry aluminum sides to climb upward during baking. A greased surface gives it nothing to hold onto and the cake slides straight back down.
- Use a Serrated Knife to Slice. A standard chef’s knife pressed downward compresses the entire sponge before the cut completes. A serrated bread knife drawn gently back and forth slices each piece clean with zero compression. Two slow sawing strokes cut cleaner than one firm downward press every time.
Easy Variations to Try
Top individual slices with macerated strawberries and whipped cream for a classic strawberry angel food cake that works as a summer shortcake.
Slice the whole cake horizontally, fill the center layer with angel food cake frosting made from whipped cream cheese and powdered sugar, and press the top back on for a filled version that slices dramatically at the table.
Stir 2 teaspoons of lemon zest and 1 tablespoon of lemon juice into the batter just before folding in the flour for a lemon angel food cake that pairs particularly well with lemon curd and fresh raspberries.
Cooks who need a wheat-free version replace the cake flour with a certified 1:1 gluten free angel food cake flour blend at the same quantity, which produces an identical rise and crumb on the same baking timeline.
The Bob’s Red Mill gluten-free baking guide covers the specific flour blends that work best in egg-white-based batters.
Troubleshooting Guide
Something went sideways? Been there. Here is how to fix it.
- Problem: My angel food cake collapsed while cooling.
Why it happened: You likely under-whipped the egg whites, greased the pan, or cooled it right-side up.
Fix it: Next time, ensure soft peaks and cool it upside down. For the collapsed one? Cut it into cubes and make a trifle. It is fixable, I promise.
- Problem: The egg whites won’t whip up.
Why it happened: There was either a speck of yolk in the bowl, or your mixing bowl had some leftover grease on it.
Fix it: Unfortunately, you have to start over with fresh egg whites and a squeaky-clean bowl wiped down with lemon juice or vinegar.
- Problem: The cake is tough and chewy.
Why it happened: You used all-purpose flour instead of cake flour, or you folded the batter too aggressively and deflated all the air.
Fix it: Serve it with extra whipped cream to mask the texture, and be much gentler with your folding next round.
How to Store Angel Food Cake Recipe
❤
- Counter. Up to 2 days in an airtight container at room temperature. The fridge dries out the delicate sponge faster than any other storage method, so skip it when the cake disappears within two days.
- Freezer. Up to 3 months. Wrap the fully cooled plain cake tightly in plastic wrap then foil. Thaw on the counter for two to three hours before serving.
- Toppings stored separately. Fresh berries or whipped cream left on the sponge overnight turn the surface to mush. Store all toppings in separate containers and add them per slice right before serving.
- Reheat. Never. Serve at room temperature only.
Angel Food Cake Recipe
Ingredients
Equipment
Method
- Prep the oven and panPosition an oven rack in the bottom third of the oven and preheat to 350°F (177°C). Set a clean, completely dry, completely ungreased 9 or 10-inch tube pan nearby. Grease on the pan surface prevents the batter from climbing the sides and produces a flat, collapsed cake.
- Blitz the sugarPlace all 1¾ cups of granulated sugar into a food processor and blend for about 1 minute until finely ground. Remove 1 cup (200g) of the fine sugar and set it in a medium bowl. Leave the rest in the food processor.
- Make the flour mixtureAdd the cake flour and salt to the food processor with the remaining sugar. Pulse ten times until combined.
- Sift the reserved sugarSet a fine-mesh sieve over the medium bowl containing the reserved 1 cup of fine sugar and sift it through. Discard any large grains caught in the sieve.
- Sift the flour mixturePlace the same sieve over a large bowl and sift the flour and sugar mixture through it. Set this bowl aside.
- Whip the egg whitesCombine the room-temperature egg whites and cream of tartar in a large, completely grease-free mixing bowl. Beat on low speed with a stand mixer fitted with the whisk attachment until the whites turn frothy across the surface, about 1 minute.
- Add sugar to the whitesIncrease the mixer speed to medium and add the reserved 1 cup of fine sugar one tablespoon at a time, waiting a few seconds between additions. Once all the sugar incorporates, beat until the whites reach soft, glossy peaks that flop over at the tip when the whisk lifts out. This takes about 5 minutes total. Add the vanilla and beat on low for ten seconds. Stiff peaks prevent the cake from rising in the oven, so stop at the soft, floppy stage.
- Fold in the flourSift one-third of the flour and sugar mixture over the egg whites and fold gently with a wide silicone spatula using slow, sweeping strokes from the bottom of the bowl upward. Repeat with the second third, then the final third. Gentle folding preserves the air structure that makes this cake rise. Aggressive stirring produces a flat, dense result.
- Fill the panTransfer the batter into the ungreased tube pan and smooth the top with a spatula. Run a thin knife or skewer through the batter in a slow circle to release any large trapped air bubbles. Tap the pan gently on the counter twice.
- BakeBake for 35 to 40 minutes until the surface turns deep golden brown and a skewer inserted into the center comes out clean. The cake rises well above the pan rim during baking.
- Cool upside downInvert the pan immediately onto its built-in feet or onto the neck of a bottle if your pan has no feet. Leave the cake to cool completely upside down for at least 1 hour. Cooling right-side up allows gravity to compress the foam structure before it sets and produces a flat, dense disk rather than a tall sponge.
- Remove and serveRun a thin knife along the outer edge of the pan and around the center tube. Pull the center piece free, then run the knife along the bottom of the pan. Invert onto a cake stand and dust with powdered sugar if desired. Use a serrated bread knife to slice, since a standard chef's knife compresses the sponge flat with each cut.