
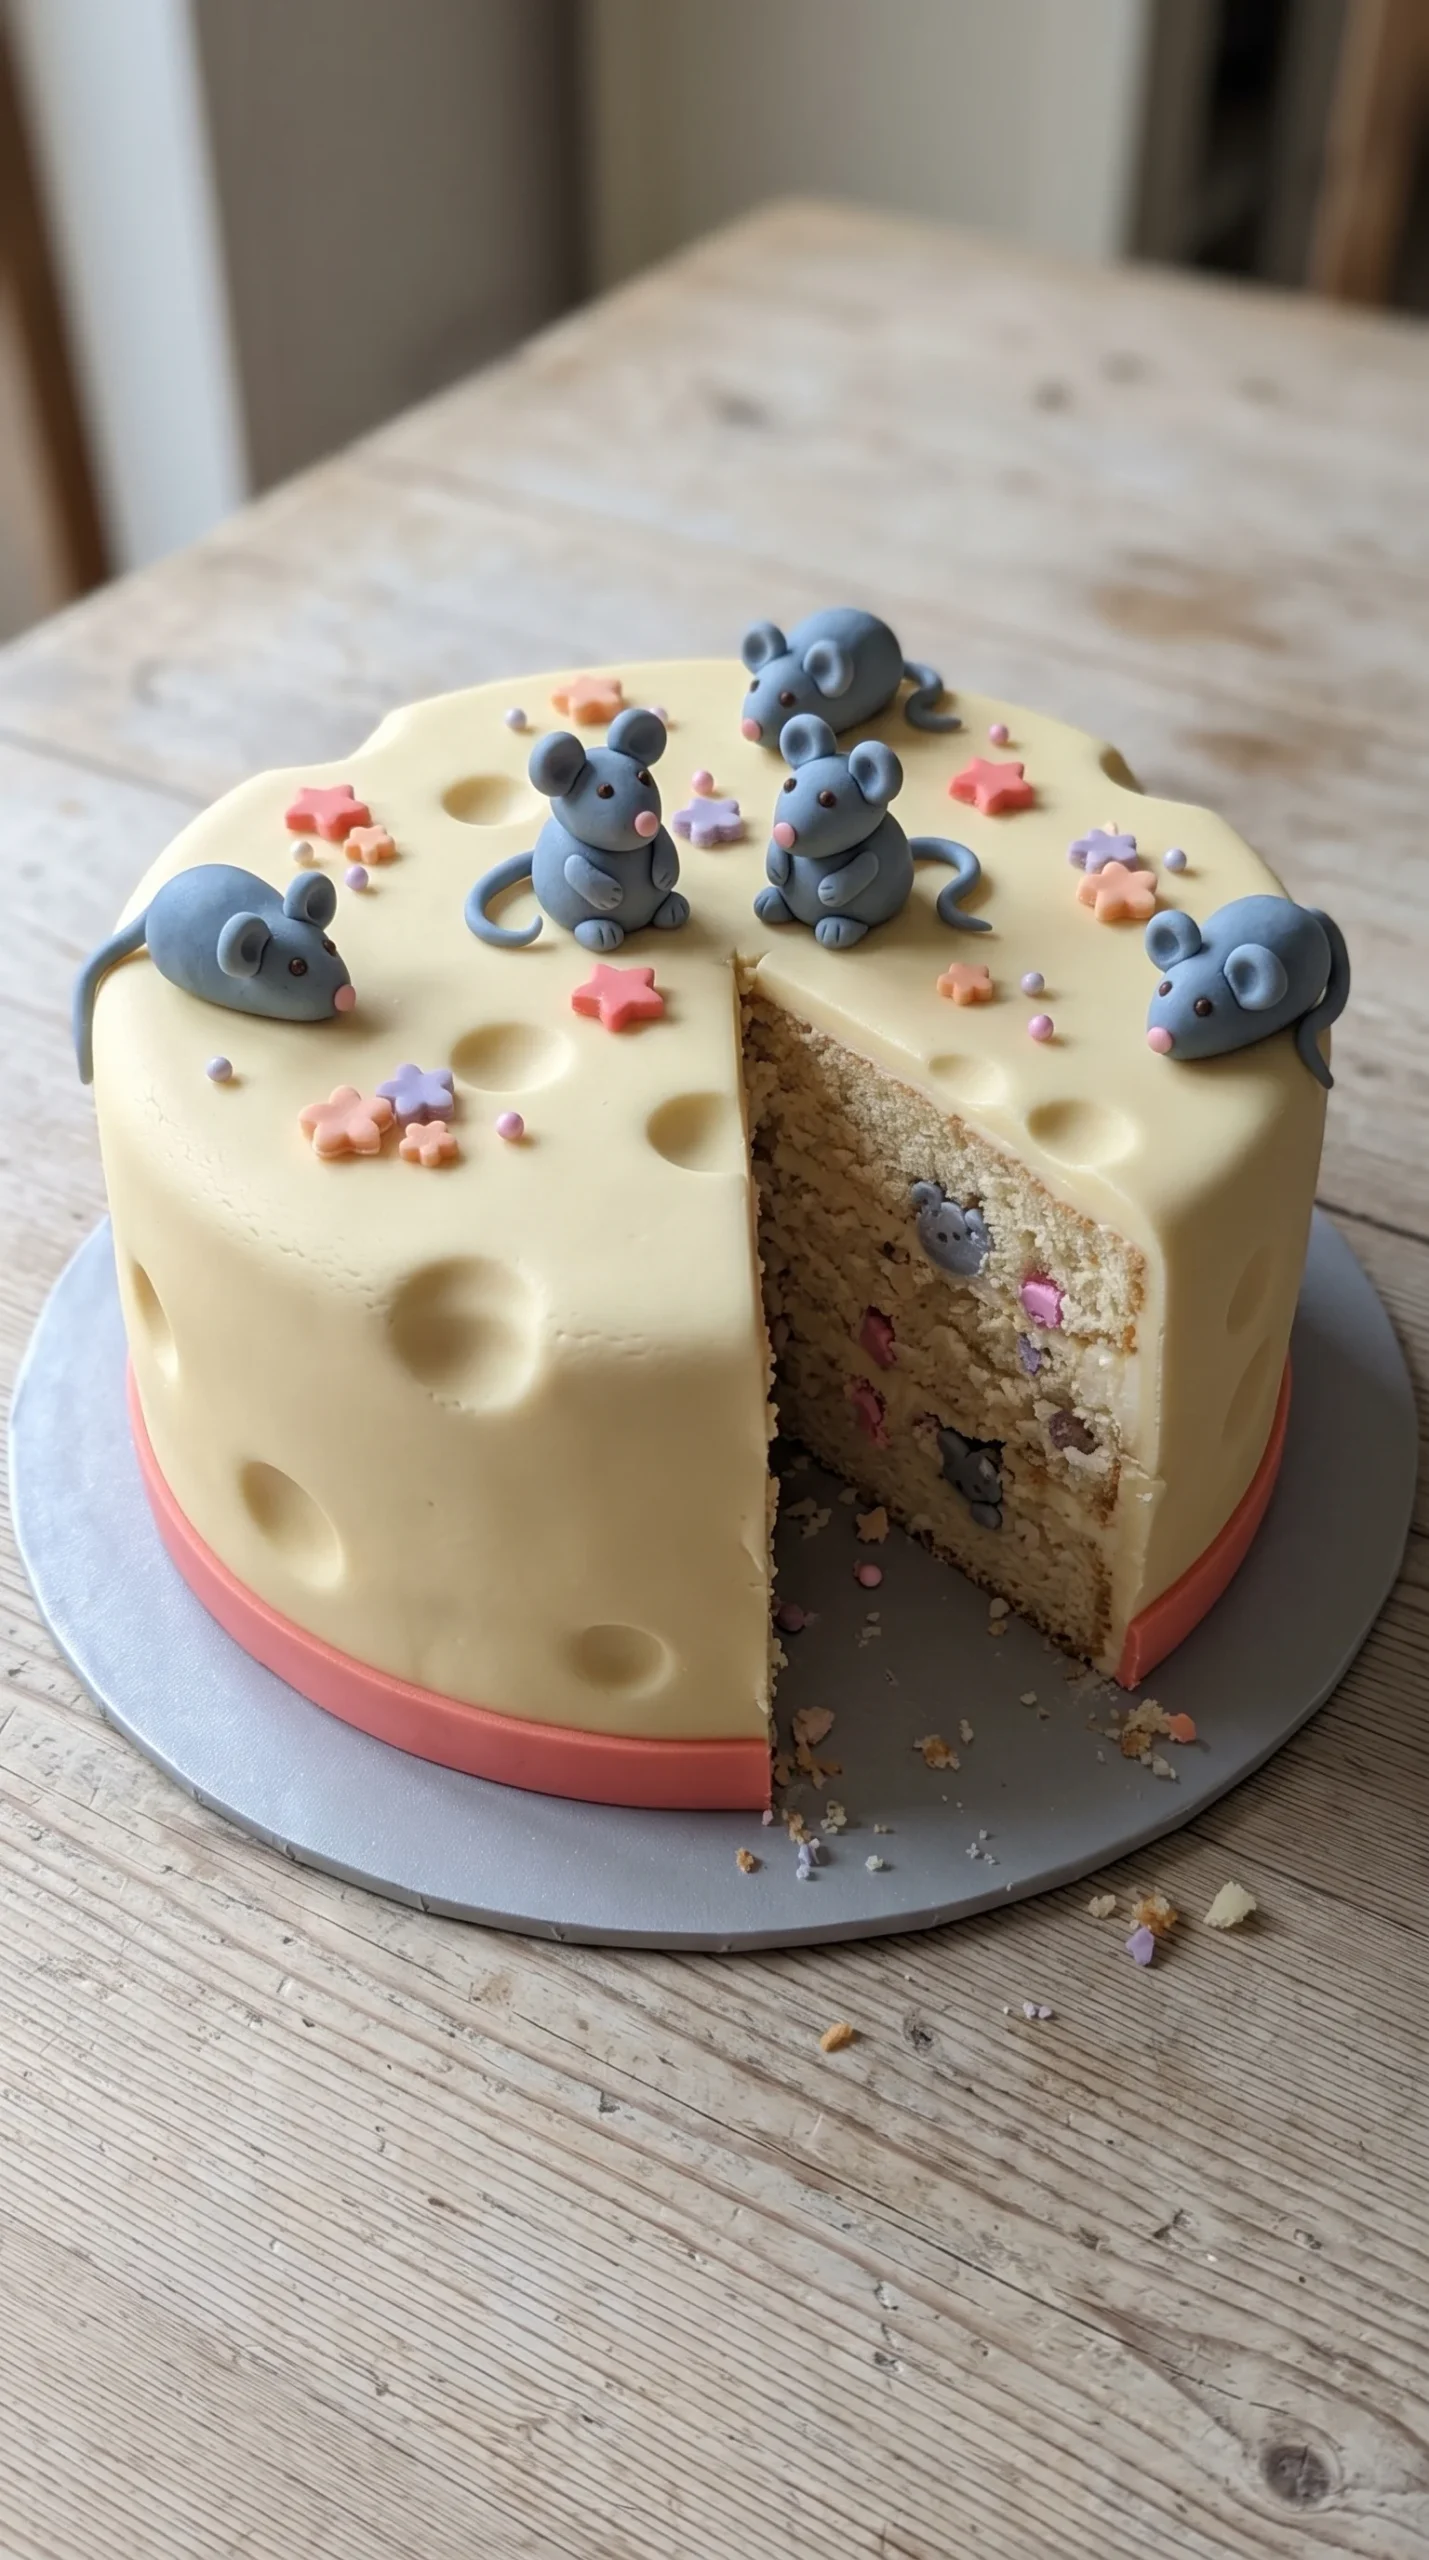
I made this cake because my niece asked for “a cheese, but with mice, but also a cake.” I said yes before I understood what I agreed to. Three hours, one fondant meltdown, and a mouse that looked more like a potato later, I had something I felt proud of.
It is a vanilla layer cake covered in pale yellow fondant, poked with holes like a wheel of Swiss cheese, and topped with tiny gray mice. The real fun hides inside: candy and little mice tuck into the middle layer, so every slice brings a surprise. Bake the cake at 350°F for 25 to 30 minutes, cool it completely, fill it, cover it, and decorate it. Serve it with cold milk and a dramatic first cut.
Why You’ll Love This Recipe
- A wow factor with no special skills: The holes are just a spoon pressed into fondant. Nobody has to be a pro.
- Make-ahead friendly: The mice and decorations can be made 2 to 3 days early, so decorating day is calm (ish).
- Kid-approved: Kids love shaping the mice and picking the candy for the surprise. Warning: some fondant will get eaten.
- Forgiving: Crooked mice are cuter. Honestly.
Tools You’ll Need
Nothing too fancy, I promise.
- Three 7-inch round cake pans: Three thin layers stack nicely and bake evenly.
- Electric mixer: For the cake batter and the buttercream.
- Round cookie cutter (about 1 1/2 inches): For cutting the surprise holes in the middle layer.
- Rolling pin and powdered sugar: For rolling out the fondant without it sticking.
- Small star and flower cutters: For the pastel decorations.
- Melon baller, small spoon, or bottle cap: For pressing the cheese holes.
- Edible food pen: For the mouse eyes. A toothpick dipped in brown gel color works too.
Ingredients
Vanilla Cake:
- 2 1/2 cups all-purpose flour (300 g). Spoon and level it, don’t scoop straight from the bag.
- 1 1/2 cups granulated sugar (300 g)
- 1 tablespoon baking powder. This gives the lift.
- 1/2 teaspoon fine salt
- 1 cup butter, softened (2 sticks, 225 g). Softened, not melted.
- 4 large eggs, at room temperature. They beat up fluffier.
- 1 cup whole milk (240 ml)
- 2 teaspoons vanilla extract. The good stuff, if you have it.
Vanilla Buttercream:
- 1 1/4 cups butter, softened (about 2 1/2 sticks, 300 g)
- 3 3/4 cups powdered sugar (450 g). Sift it if you’re feeling ambitious.
- 2 teaspoons vanilla extract
- 2 tablespoons milk. Add a splash more if it’s too stiff.
Surprise Filling and Decorations:
- 1/2 cup mini pastel candies (about 3 oz, 80 g). Mini M&M’s or pastel chocolate drops work great.
- 28 oz pale yellow fondant (800 g). Or white fondant plus a touch of yellow gel color and a pinch of ivory.
- 4 oz coral fondant (120 g). This makes the base band, the stars, and the mouse noses.
- 4 oz gray-blue fondant (120 g). This makes the mice.
- 3/4 oz lavender fondant (20 g)
- 3/4 oz peach fondant (20 g)
- 2 tablespoons pastel sugar pearls
- 1 brown edible food pen
- 2 tablespoons powdered sugar, for dusting the counter
How To Make Cheese Wheel Mouse Cake
Heat your oven to 350°F. Grease and flour three 7-inch pans and line the bottoms with parchment.
- Cream butter and sugar: Beat the butter and sugar for about 4 minutes until pale and fluffy. Add the eggs one at a time, then the vanilla.
- Add dry ingredients and milk: Whisk the flour, baking powder, and salt together. Add to the batter in three parts, alternating with the milk, and stir just until combined. Don’t overmix, or the cake gets tough. Divide among the pans.
- Bake: Bake for 25 to 30 minutes, until a toothpick comes out clean. Cool 10 minutes in the pans, then turn out onto a rack. Cool completely, about an hour. Warm cake plus buttercream equals a melted disaster.
- Shape the mice: Roll the gray fondant into 4 pear-shaped bodies for the top (2 sitting, 2 lying down) and 2 tiny ones for inside. Add flat little ears and thin curled tails. Make the noses from coral fondant and draw the eyes with the food pen. Let them dry.
- Cut the stars and flowers: Roll out the coral, lavender, and peach fondant to about 1/8 inch and cut shapes. Let them dry flat.
- Make the buttercream: Beat the butter for 5 minutes until it turns pale. Add the powdered sugar a bit at a time, then the vanilla and milk. Beat until smooth.
- Build the surprise: Use your cutter to punch 4 or 5 holes in the middle layer. Fill them with the candies and tuck a mini mouse into two of them. Stack the three layers with buttercream between each.
- Crumb coat: Cover the whole cake with a thin, smooth layer of buttercream. This is what the fondant sticks to. Chill for 30 minutes until firm.
- Cover with fondant: Dust your counter with powdered sugar. Roll the yellow fondant to about 1/6 inch thick in a big circle. Drape it over the cake, smooth from the top down to push out air bubbles, and trim the excess at the base.
- Make the cheese holes: Gently press a melon baller or small spoon into the fondant, top and sides, in different sizes. Smooth the edges with your finger.
- Add the coral band: Roll the coral fondant into a strip about 1 1/2 inches tall and 22 inches long. Wrap it around the base and glue with a dab of water.
- Decorate: Stick on the mice, stars, flowers, and sugar pearls with a little water. Put a few mice near the holes, like they’re up to no good.
♥ The Misfit Tips!
- Don’t skip the crumb coat. I once covered a cake in fondant without one, and the whole thing slid sideways like a very sad pudding. A thin layer of buttercream is the glue.
- Don’t refrigerate after fondant. The fondant sweats and gets sticky and shiny in the fridge. Once it’s covered, keep the cake at room temperature.
- Crooked mice are better mice. Mine had one ear bigger than the other and my niece said it looked “like he’s listening.” Leave the imperfections.
- Roll the fondant thick enough. Too thin and it tears when you drape it. About 1/6 inch is the sweet spot.
Perfect Pairings
- A cold glass of milk, because mice and cheese. It writes itself.
- A big mug of hot cocoa for a birthday party.
- Fresh strawberries on the side to cut the sweetness.
- A candle (or several) and a very dramatic first slice.
How to Store ❤
❤
- Room temperature: Keep the covered cake in a cake box or under a dome for up to 2 days, out of direct sunlight.
- Fridge: Only if you’re not covering it with fondant. Without fondant, the cake keeps for 4 days in an airtight container.
- Freezer: Freeze the unfrosted cake layers, wrapped tightly in plastic and then foil, for up to 3 months. Thaw at room temperature before decorating.
- Make-ahead: The mice and stars can be made up to 3 days ahead. Store them in a loosely covered box at room temperature, not in the fridge.
Cheese Wheel Mouse Cake
Ingredients
Method
- Prepare the Oven and Cake PansPreheat the oven to 350°F (175°C). Grease and flour three 7-inch round cake pans, then line the bottoms with parchment paper to help the cakes release easily after baking.
- Cream the Butter and SugarIn a large mixing bowl, beat the butter and sugar for about 4 minutes, until the mixture is pale, light, and fluffy. Scrape down the sides of the bowl as needed to ensure everything is evenly incorporated. Add the eggs one at a time, beating well after each addition. Mix in the vanilla extract until combined. Add the Dry Ingredients and Milk.In a separate bowl, whisk together the flour, baking powder, and salt. Add the dry ingredients to the butter mixture in three additions, alternating with the milk. Begin and end with the dry ingredients, mixing gently after each addition until just combined. Avoid overmixing to keep the cake tender. Divide the batter evenly among the three prepared pans and smooth the tops.
- Bake the Cake LayersBake for 25–30 minutes, or until a toothpick inserted into the center of each cake comes out clean. Let the cakes cool in their pans for 10 minutes, then carefully turn them out onto a wire rack. Remove the parchment paper and allow the layers to cool completely, about 1 hour, before decorating. The cakes must be completely cool before adding buttercream or fondant to prevent the frosting from melting.
- Shape the Fondant MiceRoll the gray fondant into four pear-shaped bodies for the top of the cake: two sitting mice and two lying-down mice. Shape two additional miniature mice to hide inside the cake for the surprise filling. Add flat fondant ears and thin, curled tails to each mouse. Use small pieces of coral fondant to create the noses, then draw the eyes with an edible food coloring pen. Set the mice aside to dry and firm up before placing them on the cake.
- Cut the Fondant Stars and FlowersRoll the coral, lavender, and peach fondant on a lightly dusted work surface to approximately ⅛ inch thick. Use small cutters to create star and flower shapes in different colors. Transfer the decorations to a flat surface and let them dry so they hold their shape when added to the cake.
- Make the ButtercreamIn a large bowl, beat the butter for about 5 minutes, until pale and fluffy. Gradually add the powdered sugar, mixing between additions to prevent it from scattering. Add the vanilla extract and milk, then beat until the buttercream is smooth and spreadable. If the buttercream is too thick, add a little more milk as needed.
- Create the Surprise FillingPlace the middle cake layer on a flat surface. Using a small round cutter, cut four or five holes into the center area of the layer, making sure not to cut all the way through the cake. Fill the holes with candies, then tuck one miniature fondant mouse into two of the holes. Keep the filling contained within the openings so the next cake layer sits flat.
- Assemble the CakePlace the first cake layer on a serving plate or cake board. Spread an even layer of buttercream over the top. Carefully add the middle layer containing the candy-filled holes, then spread another layer of buttercream over it. Position the final cake layer on top, aligning the edges as neatly as possible.
- Apply the Crumb CoatSpread a thin, even layer of buttercream over the top and sides of the assembled cake. This crumb coat helps seal in loose crumbs and creates a smooth surface for the fondant. Refrigerate the cake for about 30 minutes, or until the buttercream is firm.
- Cover the Cake with FondantLightly dust a clean work surface with powdered sugar to prevent sticking. Roll the yellow fondant into a large circle approximately ⅙ inch thick, making sure it is wide enough to cover the top and sides of the cake.Carefully drape the fondant over the chilled cake. Smooth it gently from the top downward, working around the sides to remove air bubbles and folds. Trim the excess fondant around the base with a sharp knife or fondant tool.
- Create the Cheese HolesUse a melon baller, small spoon, or bottle cap to press gently into the yellow fondant on the top and sides of the cake, creating holes of different sizes to resemble Swiss cheese. Avoid pressing too deeply into the cake itself. Smooth the edges of each opening gently with your fingertip for a neat, rounded finish.
- Add the Coral Fondant BandRoll the coral fondant into a long strip approximately 1½ inches tall and 22 inches long. Wrap the strip around the base of the cake, trimming any excess if necessary. Use a small dab of water to secure the ends and attach the band neatly to the fondant covering.
- Decorate the CakeAttach the fondant mice, stars, and flowers to the cake using a small amount of water. Add the sugar pearls as finishing accents, positioning them wherever they complement the design.Arrange a few of the mice near the cheese holes to make them look as though they are sneaking around the cake. Once the decorations are secure, the cake is ready to display and serve.