
Chocolate Velvet Cake With Easy Buttercream
Some Pinterest rabbit holes lead to a grocery run at 9 PM and flour on your pajamas and honestly, zero regrets. This chocolate velvet cake is the recipe that turned a confirmed frosting-avoider into someone who voluntarily bakes layer cakes on weeknights.
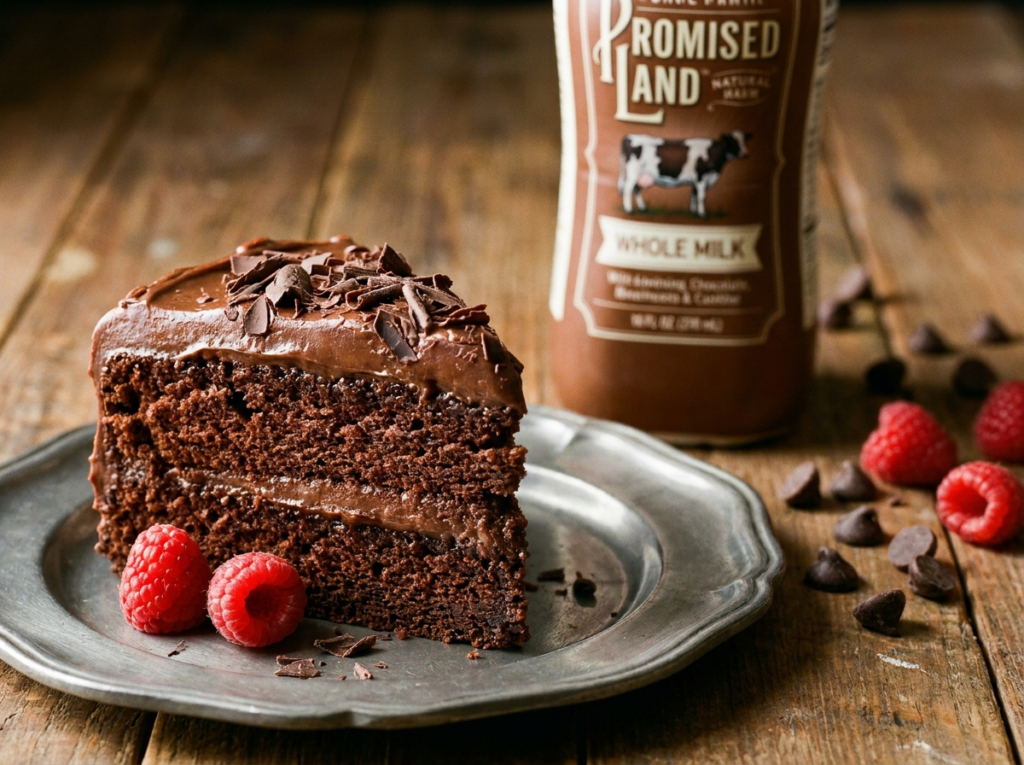
The secret is chocolate milk in the batter, which sounds almost too simple to be the reason this cake comes out so deeply moist and tender every single time.
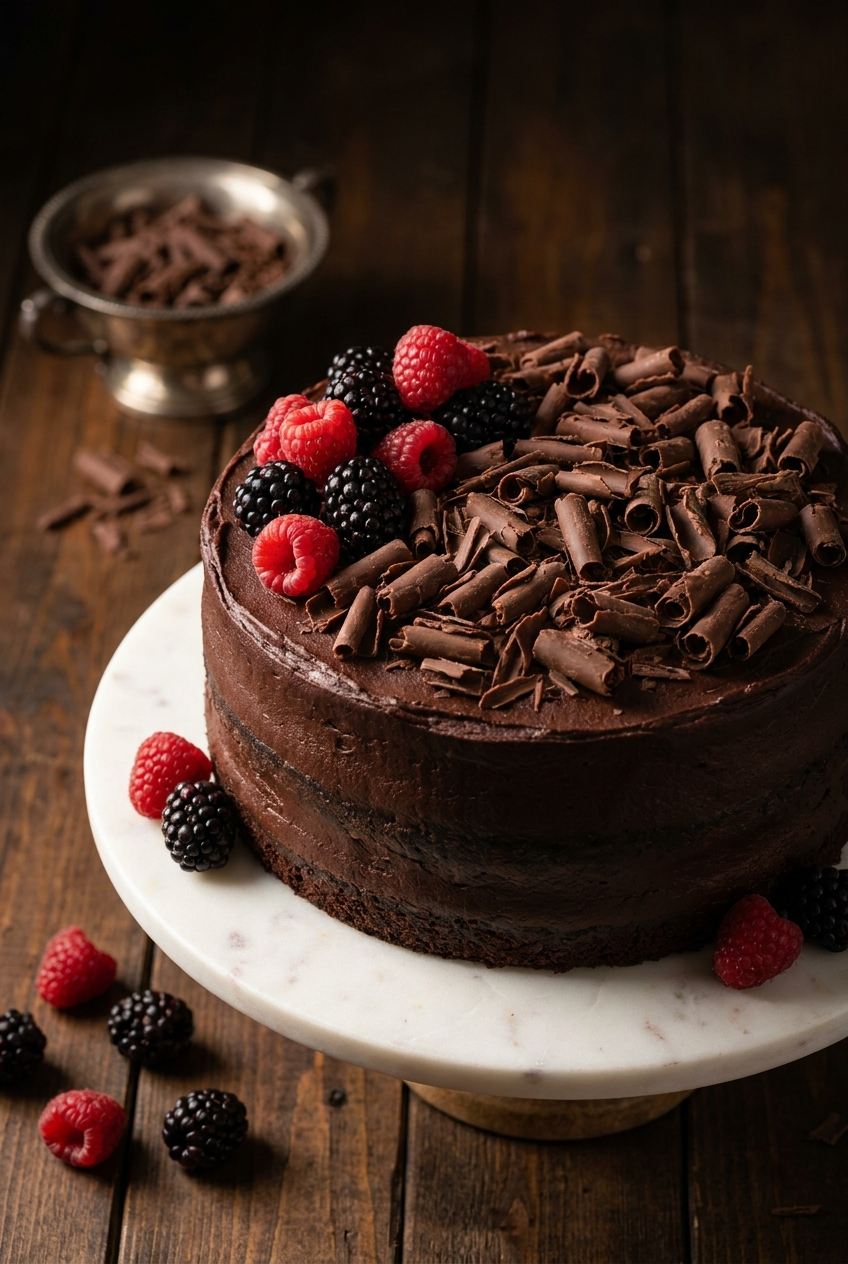
Paired with a silky, rich chocolate buttercream and finished as a naked cake where imperfect frosting becomes a deliberate rustic aesthetic this is the recipe that makes you look like you attended pastry school when you absolutely did not. If you want a chocolate velvet cake recipe that delivers maximum emotional support with minimum technical pressure, you are in exactly the right place.
Why You’ll Love This Recipe
- The secret ingredient: Chocolate milk in the batter means a deeply moist, tender crumb with built-in chocolate flavor, and you get to drink the leftover chocolate milk while it bakes.
- Zero decorating stress: The naked cake style means imperfect frosting is not a mistake, it’s the aesthetic.
- Incredible texture: Rich and deeply chocolatey without being heavy or dense — the crumb stays soft for days.
- Fake fancy: Scatter whatever berries are dying in your fridge on top, add chocolate shavings, and it instantly looks like a bakery window display.garnish it with whatever fruit is dying in your fridge and it instantly looks like a bakery window display.
Tools You’ll Need
Nothing fancy, I promise.
- 8-inch round cake pans: Springform pans are ideal for easy release, but standard round pans work perfectly if you grease them aggressively with butter and line the bottoms with parchment.
- Parchment paper: Non-negotiable. Skipping it means half your cake stays bonded to the pan and your evening ends in sadness.
- Vegetable peeler: For making chocolate shavings directly from a chocolate bar, which is the most effortless fake-fancy garnish in all of baking.
Ingredients
Chocolate Cake
- 2¼ cups cake flour — Lower protein than all-purpose flour, which is what gives this cake its signature soft, velvety crumb. According to King Arthur Baking, cake flour produces a noticeably more tender texture in layer cakes compared to all-purpose. No cake flour? See the DIY substitute in Recipe Notes below.
- 2 1/2 tsp baking powder – Check the expiration date, seriously.
- 1 tsp salt – Balances out all the sweet stuff.
- 1/2 cup unsalted butter – Room temperature, which means leave it out for an hour, do not microwave it into a puddle.
- 1 1/2 cups sugar – Regular white granulated sugar.
- 3 oz unsweetened baking chocolate – Melted and cooled so it does not scramble your eggs.
- 2 large eggs – Also room temperature if you can remember.
- 1/4 tsp baking soda – For that extra lift in the oven.
- 2 Tbsp hot tap water – This activates the baking soda.
- 1 cup chocolate milk – The secret weapon of this entire operation.
Chocolate Buttercream
- 2 cups unsalted butter – Four whole sticks. Just embrace it.
- 1 1/2 cups cocoa powder – Sift it if it looks lumpy, otherwise you will be chewing on bitter dust pockets.
- 3-4 cups powdered sugar – Start with three, taste it, and decide how stressful your week has been.
Instructions
Set your expectations to “rustic” and remember that frosting covers a multitude of sins.
- Prep the pans: Preheat the oven to 350ºF. Using butter, grease the bottom and sides of two 8 inch round cake pans or springform pans and line the bottoms with a round piece of parchment paper. To ensure even baking, place a bake even strip around the pan. You can make your own homemade bake even strip by cutting a towel or shirt to fit the size of your pan. Get the fabric really wet, then squeeze out the dripping water but do not squeeze it too dry. Secure the fabric around the pan with a safety pin. Yes, wrapping a wet t-shirt around a cake pan sounds unhinged, but it actually stops the cake from doming in the middle.
- Mix the dries: In a small mixing bowl combine the cake flour, baking powder and salt. Set aside. I whisk this with a fork because I refuse to dirty another utensil.
- Cream the butter and sugar: In a mixing bowl combine the butter and sugar, beat with an electric mixer until fluffy, 2 minutes. Add in the melted chocolate and eggs, beat to combine. If the melted chocolate is too hot, you will make chocolate scrambled eggs, so let it cool down first.
- Combine the batter: Place the 2 tbsp of hot tap water in a small bowl, stir in the baking soda then add to the batter. Add half of the chocolate milk to the batter, stir by hand with spatula to combine. Gradually add half of the flour mixture, mixing lightly. Repeat with the second half of the chocolate milk and second half of the flour mixture – mixing just until combined. Do not overmix this or your velvet cake will turn into a velvet brick.
- Bake the cakes: Divide the batter evenly between both pans, with about 2 & 1/4 cups of batter in each pan. Bake for 30-32 minutes or until a toothpick inserted in the center comes out clean. If a few crumbs stick to the toothpick, take it out; residual heat is a real thing.
- Cool the layers: Once the cake is done, allow it to cool in the pan on a cooling rack for 10 minutes. After 10 minutes, carefully remove the cake from the pan. If using a springform pan, remove the sides and bottom. Allow the cake to cool completely on a cooling rack. Once cool, remove the parchment paper round from the bottom of the cake. If you need to level the top of your cake, do so now using either a cake lever or knife. Seriously, let it cool completely, because warm cake plus butter frosting equals a structural collapse.
- Wrap if needed: Make sure the cake is completely cool before moving forward. If you’d like to make the cake several days in advance, wrap the cake in plastic wrap and place it in the refrigerator. Wrapping it while slightly warm actually locks in the moisture.
- Start the buttercream: In a mixing bowl, beat the butter using an electric mixer until fluffy. Add in the cocoa powder, and gently mix by hand with a spatula. Mix by hand first unless you want your kitchen covered in a fine layer of brown dust.
- Sweeten the frosting: Begin to add the powdered sugar, about 1-2 cups at a time, mixing by hand first, then with the electric mixer. Continue adding powdered sugar until the frosting tastes good to you and is well mixed. Taste testing is mandatory here.
- Anchor the cake: Spread a small amount of chocolate buttercream on an 8 inch round cardboard cake circle (or whatever you are choosing to put your cake on). Place your first layer of cake on top of the cardboard. That little dab of frosting is the glue that stops your cake from sliding onto the floor.
- Frost the middle: Add a generous amount of buttercream on top of the first layer, covering it in an even layer. I use about a cup here, but measure with your heart.
- Stack and scrape: Place the next layer of cake on top of the previous one. Evenly cover the top of the cake with buttercream. Use a small offset spatula to add a thin layer of buttercream to the sides of the cake. Don’t completely cover the cake layers as they are suppose to still be visible – however if you prefer, you can cover them fully. The naked cake trend is the best thing to ever happen to lazy bakers.
- Garnish and serve: Add fresh raspberries, blackberries, and chocolate shavings to the top of the cake. Slice and serve. Use a vegetable peeler on a chocolate bar for the shavings to look like you tried way harder than you did.
♥ The Misfit Tips!
- Patience is not optional: I once frosted a “mostly” cool cake and the top layer slid off like a slow-motion tectonic event. Let the layers cool completely. Set a timer if needed.
- The chocolate shaving trick: The vegetable peeler method for chocolate shavings is genuinely life-changing, but the chocolate bar must be slightly warmed first. Cold chocolate splinters into useless dust instead of curling into beautiful shavings.
- DIY cake flour: Measure 2¼ cups all-purpose flour, remove 4½ tablespoons of it, and replace with 4½ tablespoons of cornstarch. Sift the mixture twice. This replicates the lower protein content of commercial cake flour and produces a noticeably more tender crumb.
Troubleshooting Guide
Something went sideways? Been there. Here is how to fix it.
- Problem: My cake stuck to the pan and broke apart
- Why: Cooking spray alone isn’t sufficient — butter plus parchment is the only reliable method
- Fix: Reassemble the broken pieces on the cake board and apply buttercream generously between the cracks. Once frosted, nobody will ever know.
- Problem: The buttercream is too stiff to spread
- Why: Too much powdered sugar, or the butter was too cold when you started
- Fix: Add heavy cream or milk one teaspoon at a time and whip until smooth and spreadable.
- Problem: My cake domed in the middle
- Why: The edges baked faster than the center, causing the middle to rise higher
- Fix: Slice the dome off with a serrated knife before frosting. Eat it immediately. This is called the chef’s tax and it is one of the best parts of baking layer cakes.
Perfect Pairings
This moist chocolate layer cake deserves worthy company:
- A cold glass of milk obviously and always
- A giant scoop of vanilla bean ice cream melting into a warm slice
- Strong black coffee to cut through all that powdered sugar
- Your next dinner party where you want guests to quietly wonder if you attended culinary school
How to Store no bake cheesecake
❤
- Fridge: Up to 4 days covered or in an airtight container. The crumb will dry slightly over time eat it fast.
- Freezer: Wrap unfrosted layers tightly in plastic wrap and then foil and freeze for up to 3 months. Thaw on the counter before frosting.
- Serving from cold: Let refrigerated slices sit at room temperature for 20 minutes, or microwave for 8 seconds to take the chill off without melting the frosting.
Chocolate Velvet Cake
Ingredients
Equipment
Method
- Prep the pansPreheat the oven to 350°F (175°C). Generously grease the bottom and sides of two 8-inch round cake pans with butter, then line the bottoms with parchment paper circles. For extra-flat layers, wrap a bake-even strip around each pan or make a DIY version by soaking a strip of old towel in water, wringing it out until damp (not dripping), and securing it around the pan with a safety pin. It sounds unhinged. It works perfectly.
- Mix the dry ingredientsIn a small bowl, whisk together the cake flour, baking powder, and salt. Set aside. A fork whisk works fine here no need to dirty a second bowl.
- Cream the butter and sugarIn a large mixing bowl, beat the softened butter and granulated sugar with an electric mixer on medium-high speed for about 2 minutes, until visibly lighter and fluffy. Add the cooled melted chocolate and eggs, and beat to combine. Make absolutely sure the chocolate has cooled even slightly warm chocolate can partially cook the eggs and ruin the batter texture.
- Build the batterDissolve the baking soda in the 2 tablespoons of hot tap water, then add to the batter. Add half the chocolate milk and stir by hand with a spatula. Add half the flour mixture and mix gently. Repeat with the remaining chocolate milk and flour. Mix only until just combined overmixing develops gluten and turns your chocolate velvet cake into a dense, rubbery brick.
- Bake the cakesDivide the batter evenly between both prepared pans approximately 2¼ cups per pan. Bake for 30–32 minutes, until a toothpick inserted in the center comes out clean or with just a few moist crumbs attached. Remove from the oven and cool in the pans on a wire rack for 10 minutes before turning out.
- Cool completelyTurn the layers out onto the wire rack and cool completely at least 1 full hour. Peel off the parchment circles. If the tops have domed, level them with a serrated knife and eat the dome as a baker's tax. Warm cake plus buttercream equals structural collapse do not rush this step.
- Make the buttercreamBeat the softened butter with an electric mixer until smooth and fluffy. Add the cocoa powder and mix by hand with a spatula first to avoid a brown dust explosion in your kitchen. Then begin adding the powdered sugar 1–2 cups at a time, mixing by hand first and then with the mixer. Continue until the frosting is smooth, fluffy, and tastes correct to you. Mandatory taste testing applies here.
- Assemble the naked cakeSpread a small dab of buttercream onto an 8-inch cake board or serving plate this anchors the bottom layer so it doesn't slide. Place the first cake layer on top. Add a generous cup of buttercream to the top of the first layer and spread evenly. Stack the second layer on top. Frost the top of the cake fully, then apply a thin layer to the sides with a small offset spatula just enough to lightly coat them, leaving the cake layers partially visible. This is the naked cake look: intentionally exposed, effortlessly elegant.
- Garnish and serveTop with fresh raspberries, blackberries, and chocolate shavings. For the shavings, warm a chocolate bar briefly in your hands for about 30 seconds, then drag a vegetable peeler firmly along the edge. You will look like you tried significantly harder than you did.